
Article Contents
LAUNCH ASSESSMENT
Select an entity
MANage open Improvement Actions (IAs)
Assign Roles For Role Assigned Template
CHOOSE ASSESSMENT MODE
Select Assessment Options
ASSESSMENT LINK & email invite
Accessing the ASSESSMENT
Reviewing Voting Results
You can also log in to check out our full facilitation guides for different types of journey here: Lean Agile Intelligence Facilitation Guides
These guides offer detailed, step-by-step instructions designed to help you deliver an exceptional experience for participants and maximize the benefits of the assessment.
1. LAUNCH ASSESSMENT
How Do I launch a Lean Agile Intelligence Assessment?
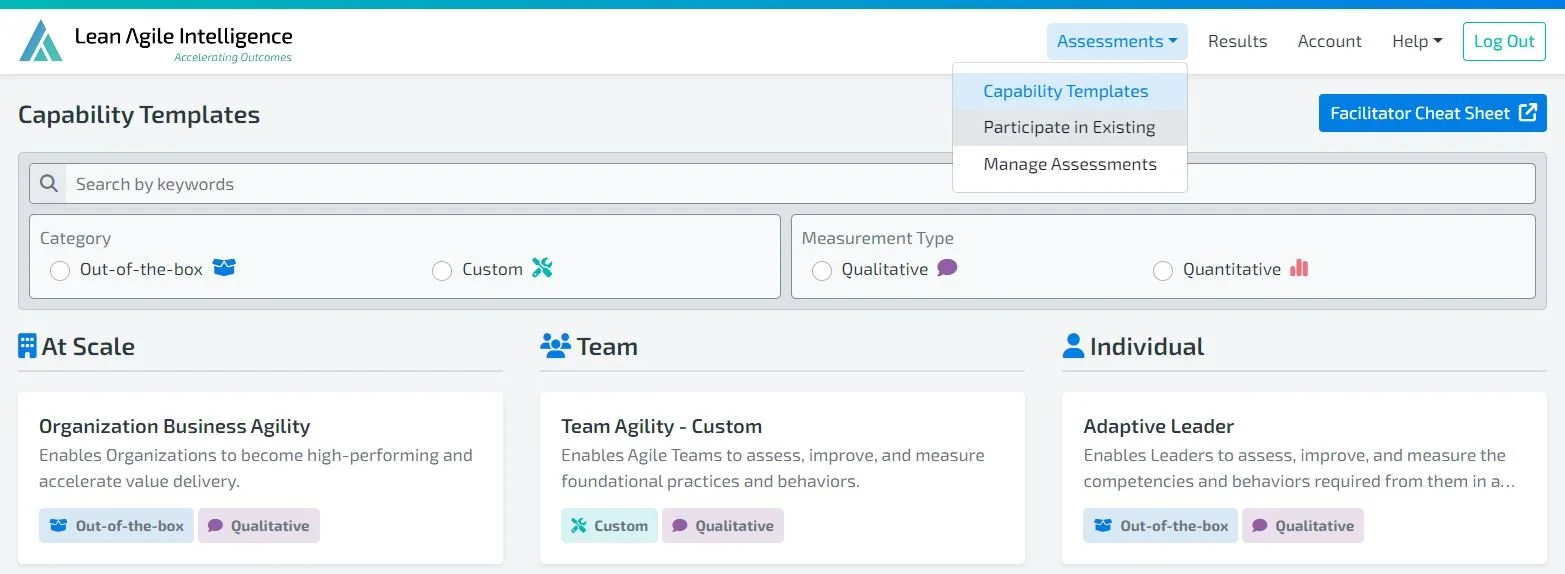
A Lean Agile Intelligence Assessment can be launched from the “Capability Templates” screen.
Steps To Launch Assessment
The “Capability Templates” screen contains the three Lean Agile Intelligence Capability Template Types
Individual
Team
At Scale
Select the Template that you want to launch under the relevant Template Type
Select the “Launch Assessment” button

2. SELECT AN ENTITY
How Do I Select the entity that I want to launch the assessment for?
If Bulk Launch Assessment in enabled, there will be a prompt allowing for launching assessments in bulk. Please check out this documentation for more information on Bulk Launch Assessment.
Entities can be selected in the “Entity” drop-down in the subsequent “Launch Assessment” screen.
Note: The Entity Type must match the Capability Template Type of the launch assessment for it to appear in the “Entity” dropdown. For example, all Entity Types of “Team” will appear for a launched Team Template.
Entities can be created directly from the subsequent “Launch Assessment” screen by selecting the “Create Entity” link
Once you have selected an Entity, click Next to Manage Improvement Actions.

3. Review Open Improvement Actions (IAs)
How Do I Manage Open Improvement Actions When launching an assessment?
After you have selected an Entity, if the selected Entity has an Open Improvement Action(s) (IA), you will be taken to the Manage Improvement Actions (IA) screen. Here you will find all Open IAs linked to the capabilities in the assessment you are about to launch.
Note: Only Improvement Actions associated with the Entity, in an Open State, and for a Capability that is in the Template being launched will be displayed.

This step is crucial for ensuring that all Open Improvement Actions (IAs) associated with the assessment's capabilities are thoroughly reviewed and resolved before launching the assessment.
It is vital to verify if the Goals and Impediments linked to these capabilities have been adequately reviewed and whether they should be carried over or excluded from the new assessment.

To close an IA, select the checkbox next to the relevant IA and click the 'Close Selected' button.

If you have Improvement Actions mapped to Jira, click the 'Refresh All from Jira' button to fetch the latest updates. If these IAs have been resolved in Jira, their status will be updated to 'Closed' in Lean Agile Intelligence (LAI) after the refresh.

To perform any other edits, navigate to the Improvement Action dashboard using the link in the description.
Once you have managed all the IAs to your satisfaction, proceed by clicking 'Next' to configure the mode of the assessment.
3. Assign Roles For Role Assigned Template
If the selected Capability Template has the Role Assignments feature enabled, you will see Step 3 (Assign Roles) in the Launch Assessment Wizard.
Here, decide whether to use role assignments by selecting between the two options: “Use Role Assignments” and “Do not use Role Assignments”.
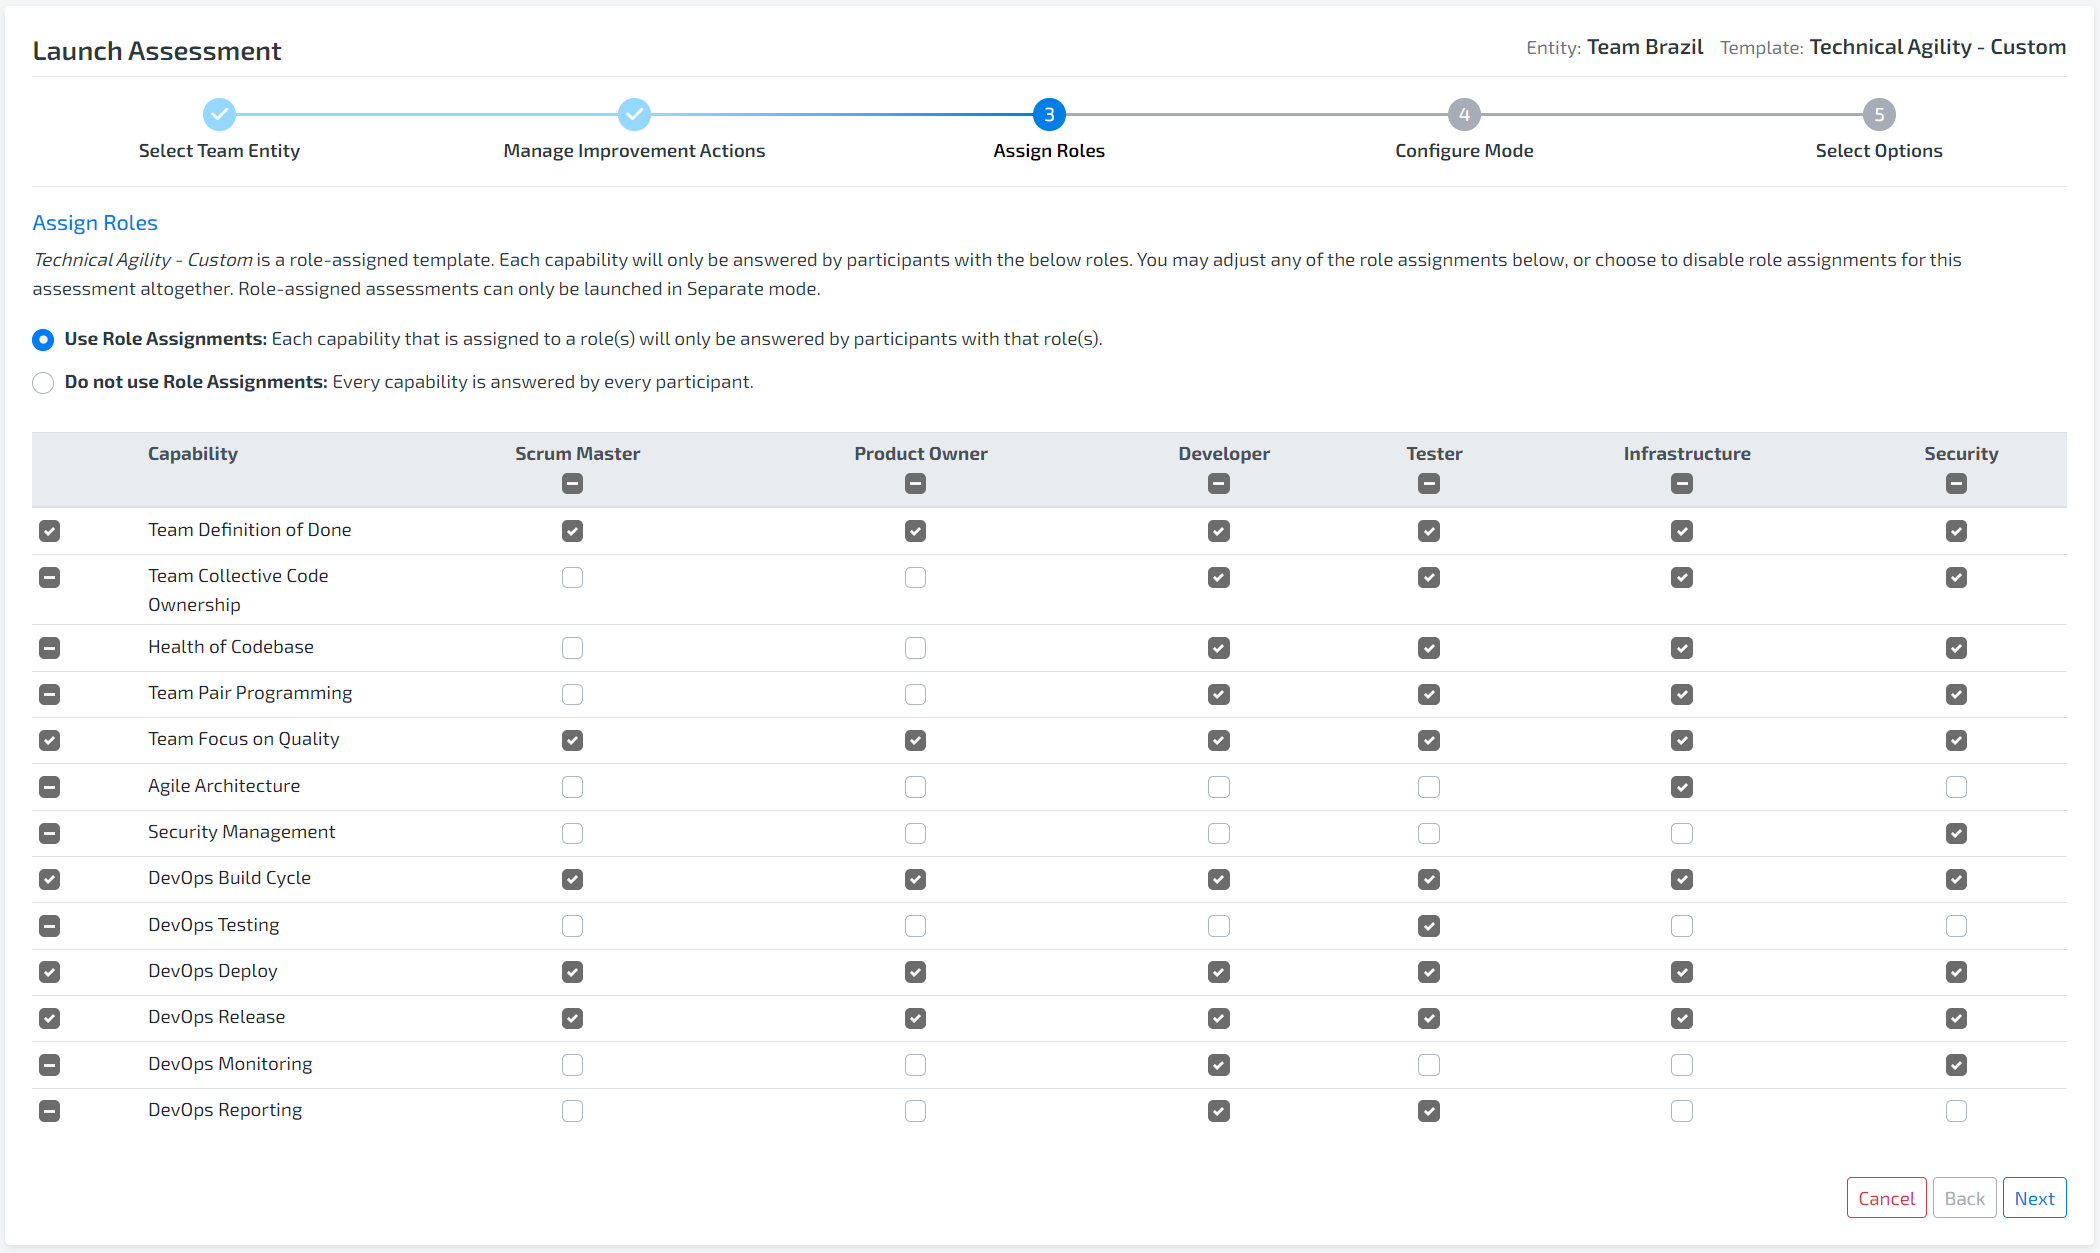
If "Use Role Assignments" is selected, roles can be overridden in the capability template. Check the role on the capability you want that role to provide a vote for or uncheck the role.
Note that each capability must have at least one role selected. (if you want to not have the role be used for this assessment, the template must be edited).
Note that using a role-assigned assessment will require that participants supply a role. Non-Registered Members will be asked for their role when joining. Registered Members will be prompted for their role when they join each assessment, giving them the opportunity to override their role as it appears in the Members screen.
Click Next to proceed.
4. CONFIGURE ASSESSMENT MODE
What is the Lean Agile Participant setting and mode?
The Lean Agile Intelligence Participant Setting and Mode determines the technique used to facilitate the Assessment. The participant’s experience will be different in each Mode.
What PARTICIPANT SETTINGS are available?
Multiple: This setting allows multiple participants to take the assessment. It is ideal for groups (Teams, Leadership, 360 Reviews, etc.) to assess and discuss discrepancies. The capability rating will be equal to the average of all votes.
Single: This setting allows ONLY one participant to take the assessment. It is ideal for a single person to capture ratings (Coach, Consultant, Leader, etc.) for an entity.
What ASSESSMENT modes are available?
Separate: Assessment is completed separately by each member. Note, that results will not be available until all members have completed the Assessment.
Together: Assessment is conducted in real-time with all members present in the Self-Assessment Platform. Together Mode is not available to be used with Role Assigned Assessments.

How does Together mode Work?
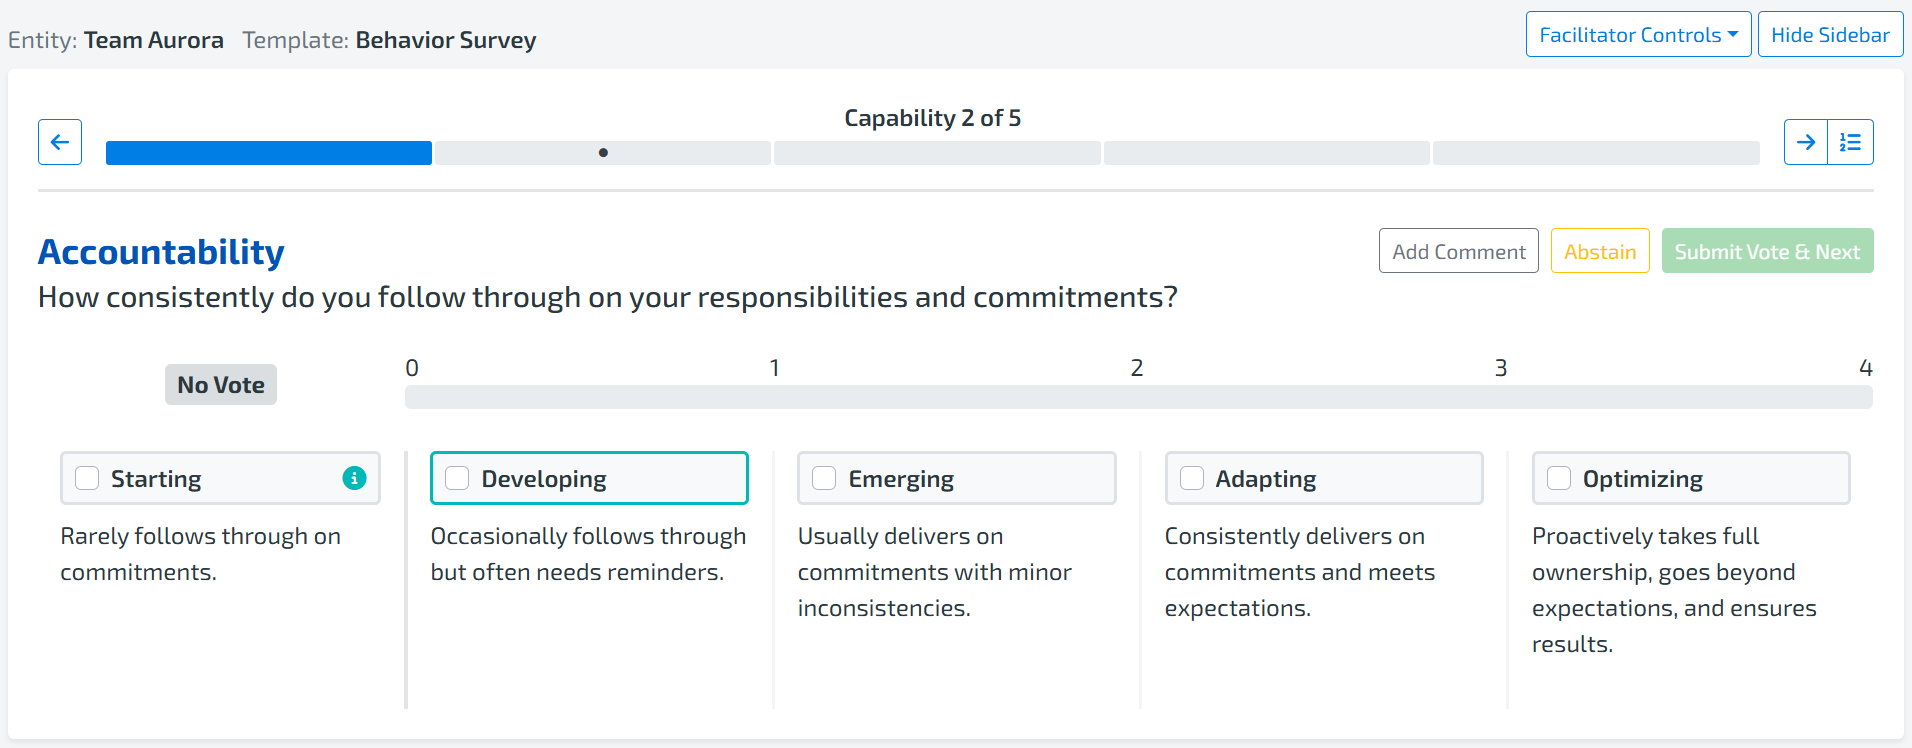
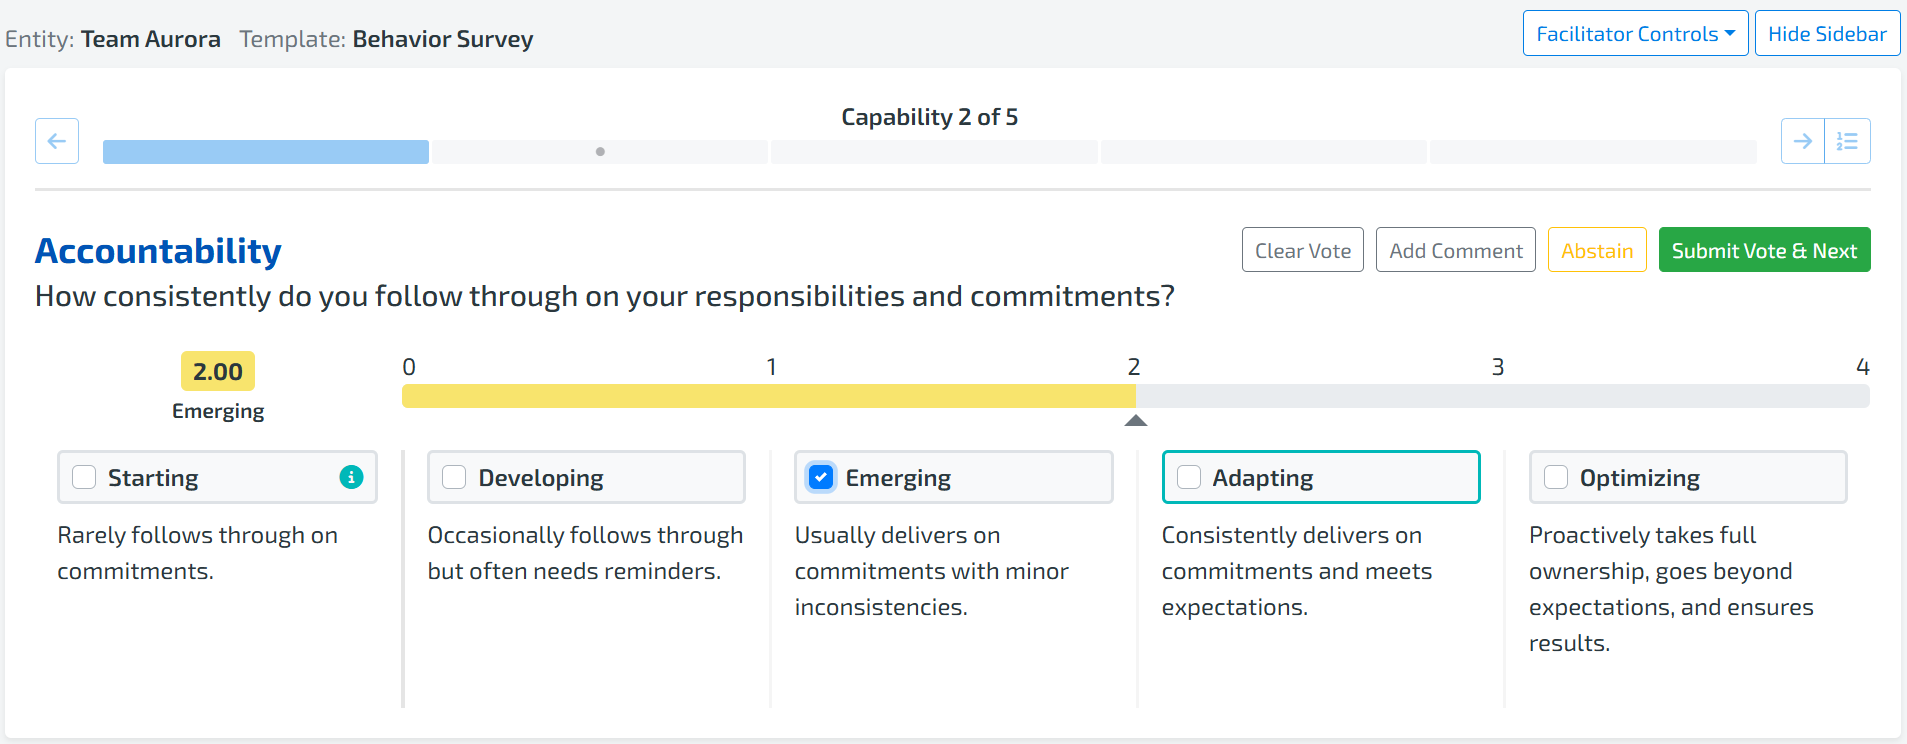
For Participants
Each Capability in the Capability Template and the Stage Criteria will be presented to the participants
If a Custom Metric is associated with a Capability and/or the Group/Entity from which the participant is taking the assessment, the Custom Metric data from the last assessment timeframe will appear in the sidebar. Please refer to this documentation for more information on Custom Metrics.
Each participant should vote on the Stage Criteria they think is the current state
Note: Stage rating is based on all criteria in that stage being selected. Partial ratings are not given. Participants should vote on the Stage which first includes all the criteria they agree with and then specific criteria they feel is applicable in other stages, the Stage that has all criteria met will be registered as a vote.
Note: If the member wishes not to cast a vote, they may click the “Abstain” button. The “Abstain” option increases the vote count but does not cast a vote that will be used to determine the Stage. This allows participants to opt-out of a Capability while communicating to the facilitator that they have facilitated the vote
The results will appear either when:
All participants have submitted a vote
The Assessment Facilitator selects “Show Results” button

Each participant can add notes to Capability by selecting the “Add Notes” button either before or after the results are shown
For Assessment Facilitators
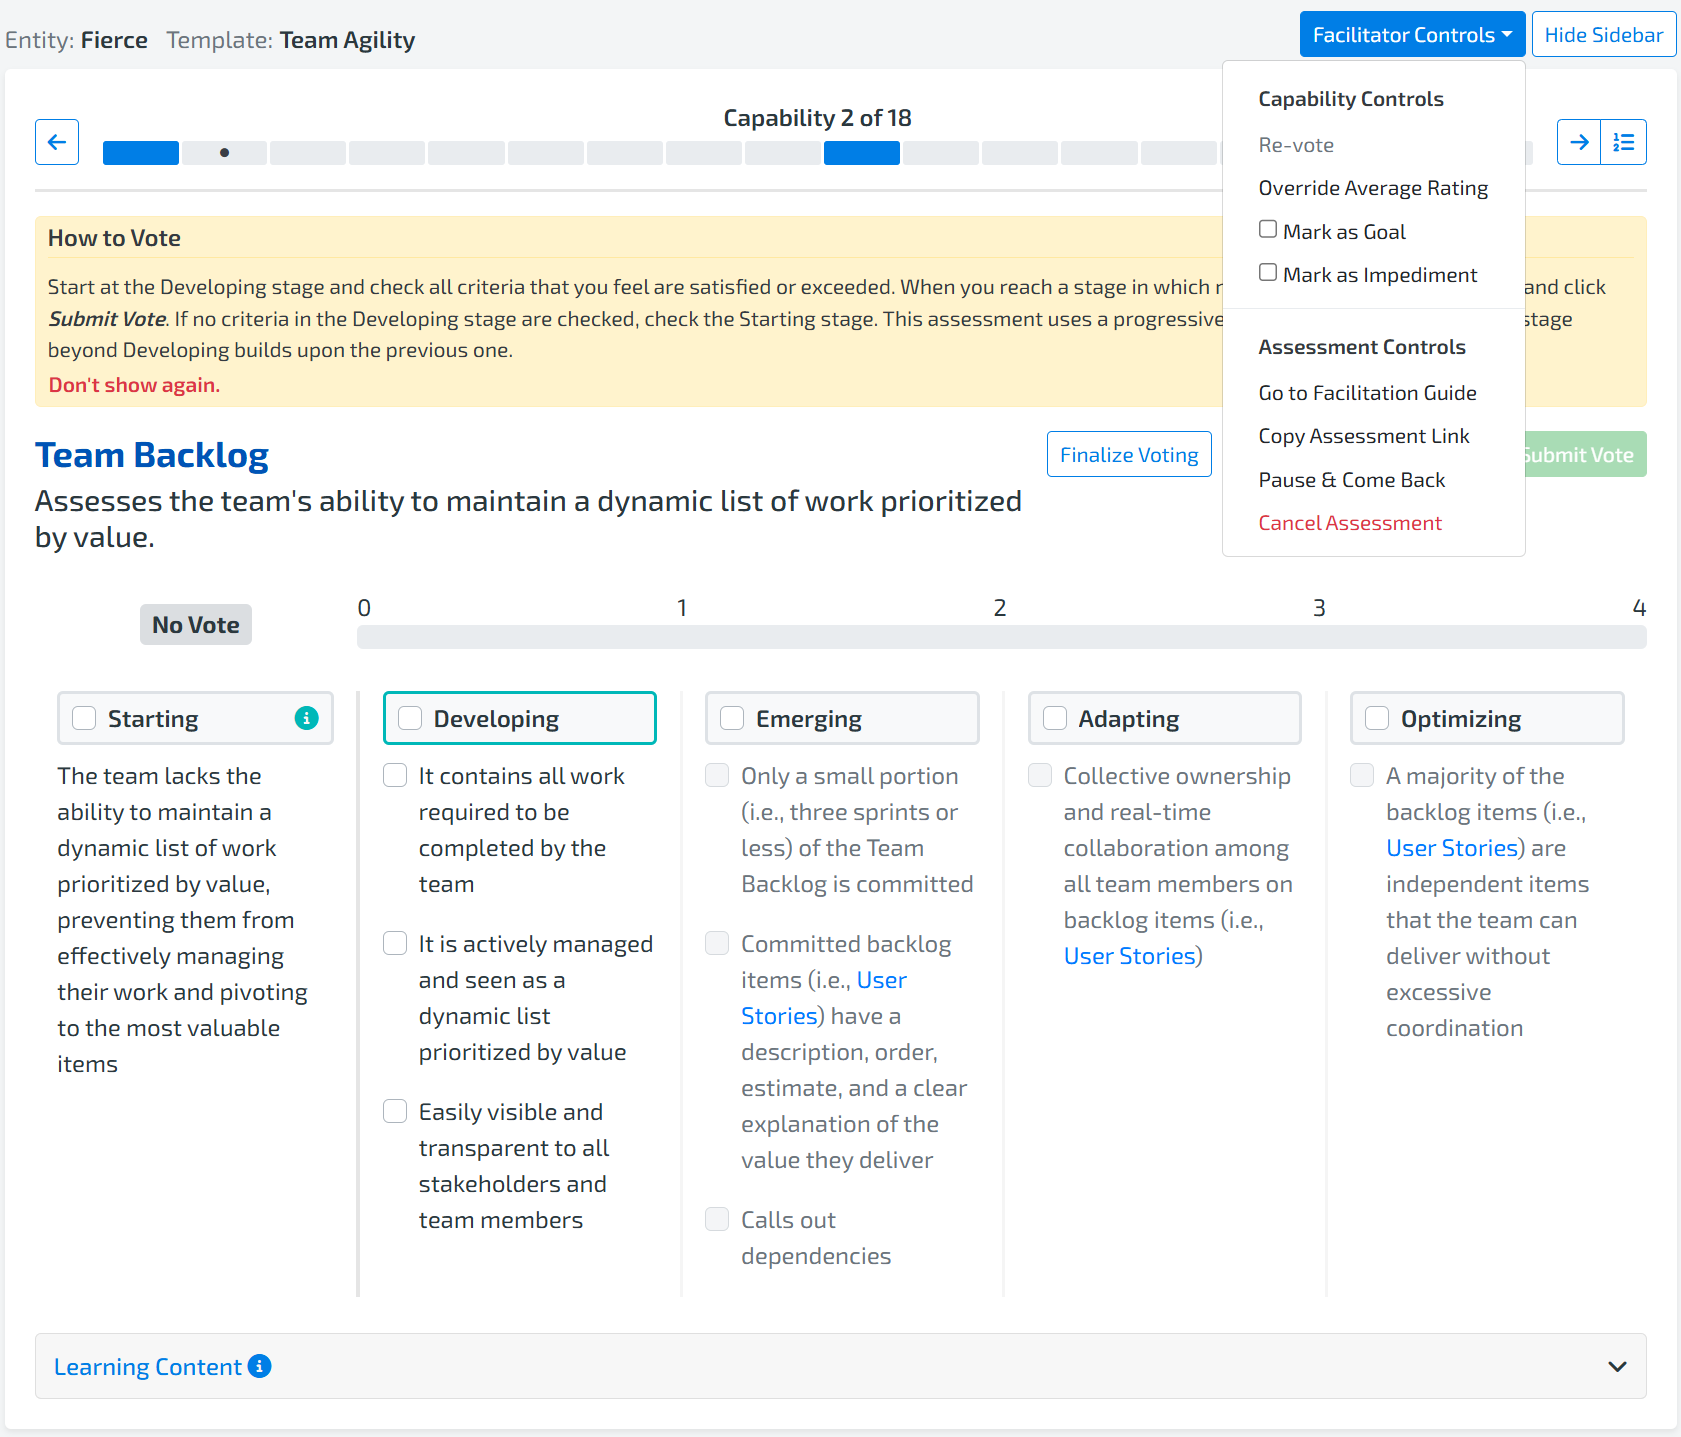
The Assessment Facilitator (Super User, Facilitator, or Admin) conducting the Assessment will have a set of controls/buttons on their Self-Assessment Platform screen
Navigation Back & Forward Arrows: Ability to navigate back and forth through the assessment
Capability Dropdown: Ability to visit a capability
Navigation Bar: Ability to visit a capability by selecting the capability on the bar
Revote: Clears the voting results for participants to vote again
Override Average: Replaces the Average Stage with the provided Stage and selected individual criteria
Finalize Voting: Finalize voting for all participants that have voted and not voted. This action will also show results of the Capability at the given time.
Clear All Votes: Ability to clear all of the votes submitted or provided by the participants for the particular capability. This will reactivate the navigation bar and buttons.
Next Capability: Move to the next capability.
Cancel Assessment: Prompts Assessment Facilitator to cancel the Assessment. This action will terminate the Assessment.
All votes and results received for Capabilities in that Assessment will be deleted
Pause & Come Back: Prompts Assessment Facilitator to save partial results of the Assessment. This action will pause the assessment and allow the Assessment Facilitator to continue the Assessment at a later date or time.
The Assessment Facilitator can continue the Assessment by going to the Manage Assessments screen and click Copy Assessment Link in the Actions drill down
Note that partially saved Assessments are not included in the “Results” dashboards
Mark as Goal: marks the Capability as a "Goal"
Goals are Capabilities that the team is targeting to improve
Note: This will only appear if the Organization Setting “Allow Goal/Impediment setting while taking an assessment” is enabled
Mark as Impediment: marks the Capability as an "Impediment"
Impediments are Capabilities that the team is unable to improve on because of something out of their control
Note: This will only appear if the Organization Setting “Allow Goal/Impediment setting while taking an assessment” is enabled
Show Comments for Participants: Once selected; participants can view the comments and prompt responses of all participants
View Comments: Shows provided notes from all participants for the Capability. Note that comments and prompt responses from previous assessments are also included.
Add Comment: Facilitators can add comments of their own
Complete Assessment: Appears on the last Capability and finalizes the assessment results

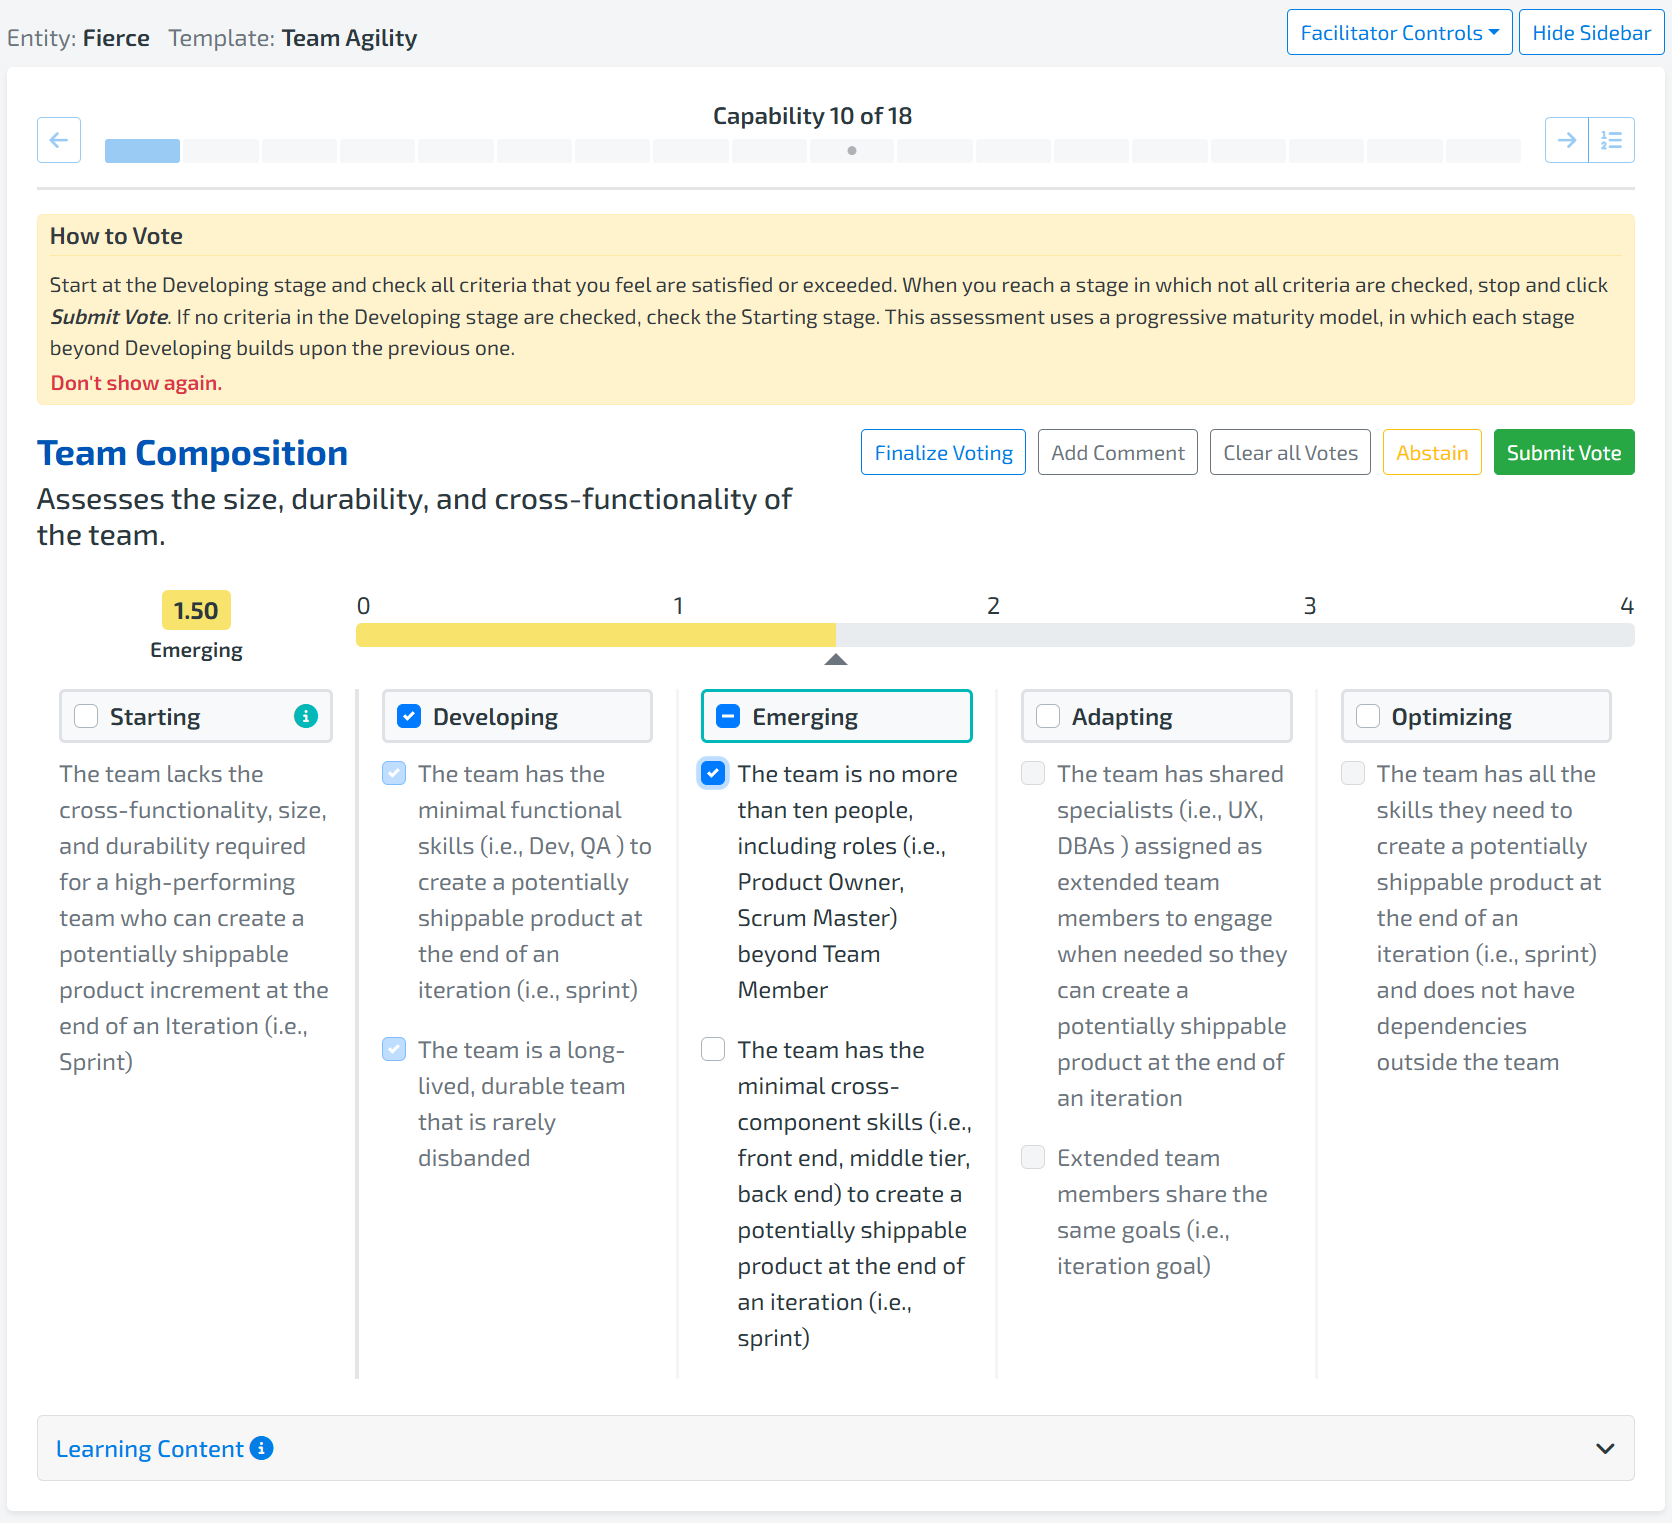
How does Separate mode Work?
For Participants
Participants will be presented with each Capability in the Capability Template in the "Self Assessment Platform" screen
Each participant should vote on the Stage they think is the current state, and the select individual criteria they identify as true for the Capability.
Note: all criteria must be met in a specific Stage for that stage to be counted as a vote
Note: if the member wishes not to cast a vote, they may click the “Abstain” button. The “Abstain” option increases the vote count but does not cast a vote that will be used to determine the Capability Rating. This allows participants to opt-out of a Capability while communicating to the facilitator that they have submitted the vote
Each participant will have a set of controls at the bottom of the “Self-Assessment Platform” screen
Navigation Back & Forward Arrows: Ability to navigate back and forth through the assessment
Capability Dropdown: Ability to visit a capability
Navigation Bar: Ability to visit a capability by selecting the capability on the bar
Clear Votes: Ability to clear selected vote. This will reactivate the navigation bar and buttons.
Submit Vote & Next: Submit vote and move to the next Capability
Note this becomes “Complete My Assessment” on the last Capability and finalizes the participant's votes
Pause & Come Back: Saves participant’s votes provided to date so they can return and finish at a later time.
Each participant can add notes to a Capability by selecting the “Add Notes” Button
At the completion of the assessment, an email containing a link will be sent to any Non-Registered member. The link will allow the member to view their responses, even after assessment completion to provide an easy way to remember what the participant voted.
For Assessment Facilitators
The Assessment Facilitator can utilize the "Self Assessment Platform" to monitor and close the Assessment
The "Self Assessment Platform" can be accessed under the "Assessments" Menu Item by selecting "Manage Assessments"
Depending on the facilitator voting option selected during Launch Assessment, the Assessment Facilitator (Super User, Facilitator, or Admin) has the option to vote or not
The Assessment Facilitator has the same control buttons at the bottom of the screen as participants to navigate Capabilities and provide votes
The Assessment Facilitator has additional buttons that assist in managing the Assessment
Facilitator View / Participant View: For role-assigned assessments only, there is a view toggle.
Facilitator View: view all capabilities no matter which role they are assigned to, allowing the facilitator to see which capabilities have been answered and notes. No voting allowed.
Participant View: if the facilitator is also a participant, view only the capabilities for the facilitator’s role and allow the member to vote on them.
Save Results & Complete Assessment: Ends the Assessment for all participants and preserves the results of the Assessments given the votes to date
The "Save Results & Complete Assessment" button should be used when all necessary votes are received and the entity is ready to review the results
Note: Assessments run in "Separate" mode will not automatically close. The "Save Results & Complete Assessment" button needs to be selected to make results available in the dashboards.
Cancel Assessment: Terminates the Assessment for all participants
When selected, all votes and results received to date for Capabilities in the Assessment will be deleted
5. SELECT ASSESSMENT OPTIONS
how Do I SELEct The Relevant Options For My Assessment
After configuring the mode for the assessment, you will be directed to the Select Options screen. In this screen, you will see the different options available depending on which mode you configured your assessment.
The options are pre-selected based on the common behavior of the similar assessment launched. However, you can change them at any time.

If your assessment is configured to be taken in Separate Mode, which mean each participant will complete the assessment separately, below are the options that will be available to you:
Are you, the facilitator, voting?: By selecting this, you indicate that the Assessment facilitator will or will not vote.
Note: If you selected the participant as a Single Participant Mode, the facilitator will be the ONLY one completing the assessment.
Do you want to require participants to enter an email address and display name?
If selected Yes, participants (non-registered members) will be required to supply an email and display name so the facilitator and other team members can identify who has joined and completed an assessment. If selected No, the member will appear simply as Participant.Do you want to require participants to enter their role?
If selected Yes, participants (non-registered members) will be required to supply their team role (scrum master, developer, etc.) so that Results may be filtered according to assessment responses by role.Do you want to show helpful resources for each capability?
If selected Yes, below each capability in the assessment, the associated list of Helpful Resources will be displayed to all participants, for reference.

If your assessment is configured to be taken in Together Mode, which means that the assessment is conducted in real-time with all members present in the Self-Assessment Platform, below are the options that will be available to you:
Are you, the facilitator, voting?: By selecting this, you indicate that the Assessment facilitator will or will not vote.
Do you want to require participants to enter an email address and display name?
If selected Yes, participants (non-registered members) will be required to supply an email and display name so the facilitator and other team members can identify who has joined and completed an assessment. If selected No, the member will appear simply as Participant.Do you want to require participants to enter their role?
If selected Yes, participants (non-registered members) will be required to supply their team role (scrum master, developer, etc.) so that Results may be filtered according to assessment responses by role.Do you want to show helpful resources for each capability?
If selected Yes, below each capability in the assessment, the associated list of Helpful Resources will be displayed to all participants, for reference.
Allow Participants to view Comments: Available only in Together mode. By default, Participants can only see their own comments for each Capability. When enabled, all Participants can see all comments for each Capability. The facilitator always sees all comments.
6. ASSESSMENT LINK & EMAIL INVITE
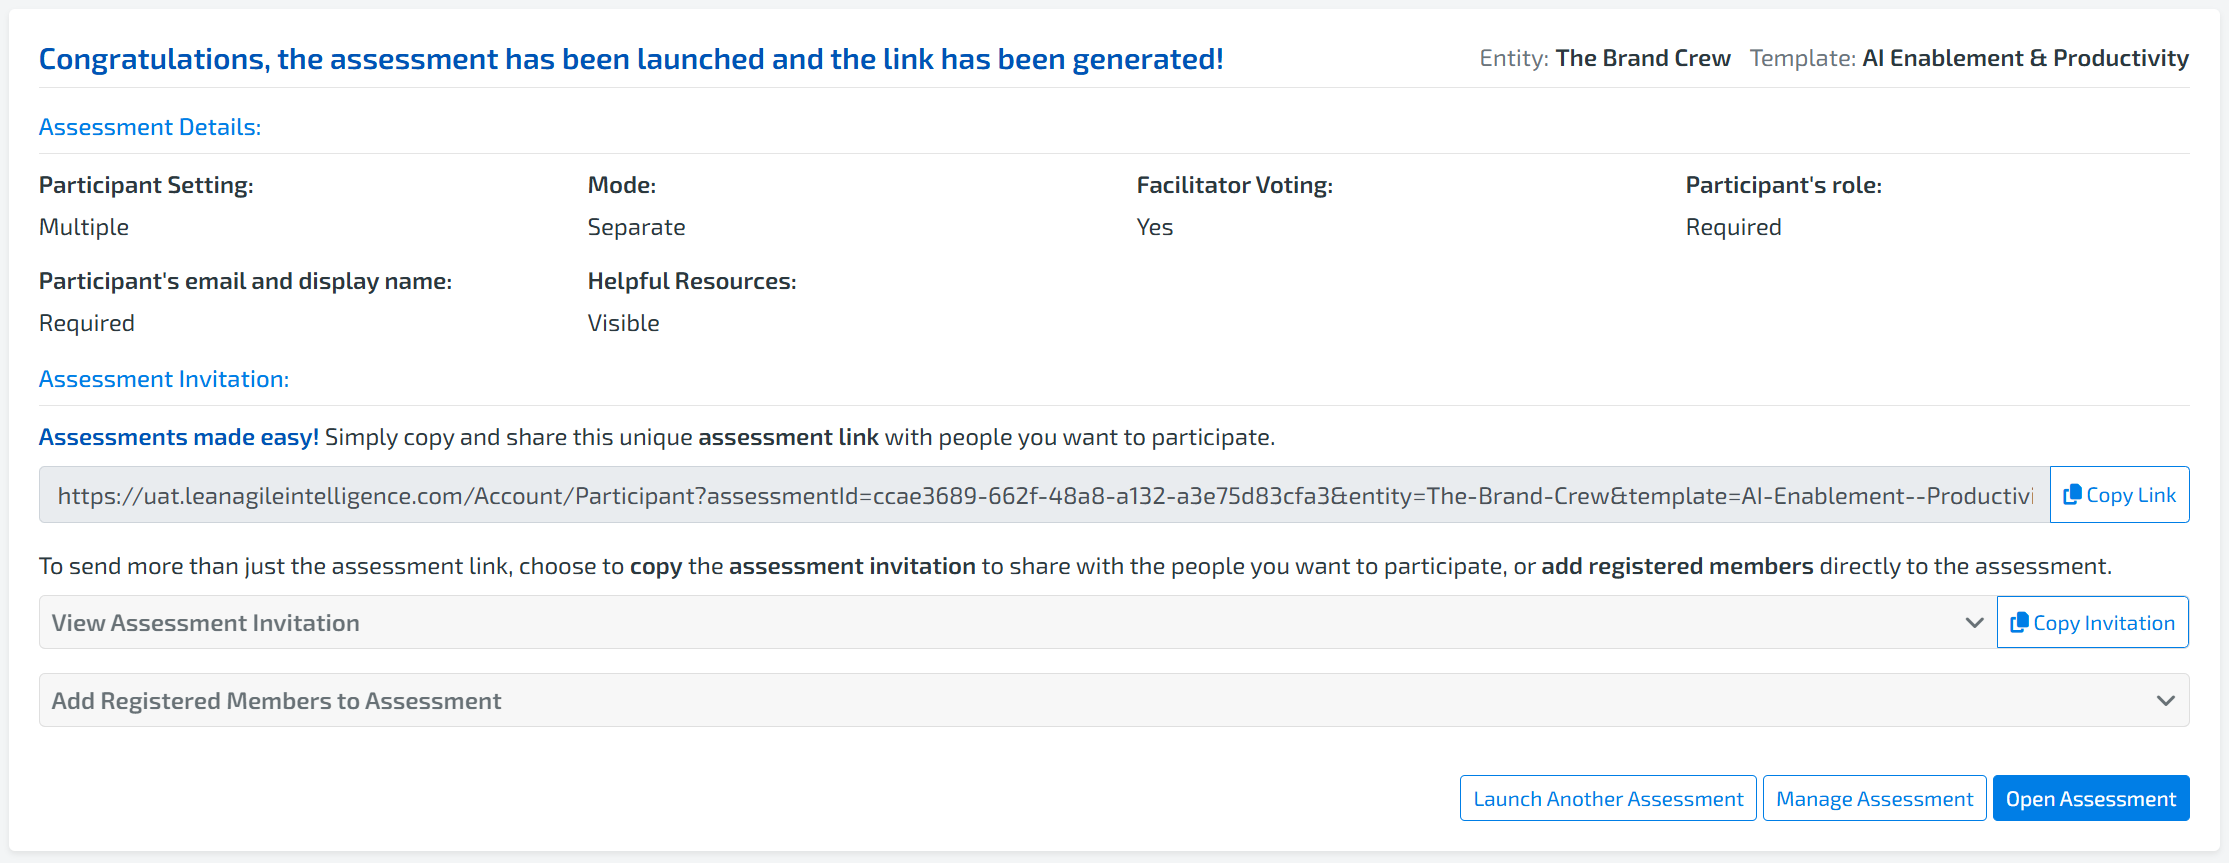
HOW DO I Invite Participants To Take The Assessment
There are three options to invite participants to take the Assessment you have just launched.
Copy Link: The 'Copy Link' option allows you to click on a button to copy the Assessment Link to your clipboard, which you can then send directly to participants.
Copy Invitation: The 'Copy Invitation' option lets you copy a pre-drafted email invitation with the Assessment Link to your clipboard. You can then create an email, paste this invitation, and send it to your desired participants.
Direct Email Invite: This option is exclusively available for members assigned to the Entity for which the assessment has been launched. Here, you can select members by checking the corresponding checkboxes and then click the 'Add Registered Member' button. This action adds the selected member as a participant and triggers an automated email invitation from Lean Agile Intelligence to the selected members.
Each of these methods offers a convenient way to ensure your participants are informed and can access the assessment.
7. ACCESSING THE ASSESSMENT
How do MEmberS access AN assessment SO THEY CAN PARTICIPATE?
Organization Members:
Members can visit Manage Assessments screen to view all In Progress assessments and click the Open Assessment button in the Actions column to participate
Organization Members will also receive an email invite with the assessment link
If your organization was created before 2024, all Members who have been assigned to an Entity that has an active Assessment can access the "Self-Assessment Platform" by selecting the "Participate in Existing" menu link under "Assessments"
Organization Assessment Non-Registered Members: Non-registered members can participate in an assessment via a unique assessment link sent by the Assessment Facilitator
Assessment Facilitators should copy the link provided on the subsequent Launch Assessment Screen and send it to potential participants
Note: If Non-Registered members go to that link before the Assessment is launched, they will receive a message that the Assessment has not yet started
Note: Once the Assessment is launched, the Non-Registered member will need to go to the link again.
Upon entering the Assessment, each Non-registered member may be required to provide Email, Role, and a Display name, depending on configuration
Note: These fields are used to distinguish and track unique members for the Organization
8. REVIEWING VOTING RESULTS
HOW DO I REVIEW VOTING RESULTS DURING THE ASSESSMENT?
During a Together Assessment only, after all participants have voted, the Voting Results screen is displayed.

The Results consist of the following pieces of information:
Voting Distribution: shows how many votes (one vote from each participant) were for each of the 5 Stages.
By toggling to Rating, the numerical ratings are displayed instead. This is useful when Enable Partial Credit organization setting is enabled and the Ratings might not always be round numbers.
Capability Rating: the Entity’s Rating for this capability (the average of all votes)
Criteria to Discuss: the first three criteria with any amount of disagreement, ordered from lowest Stage to highest Stage
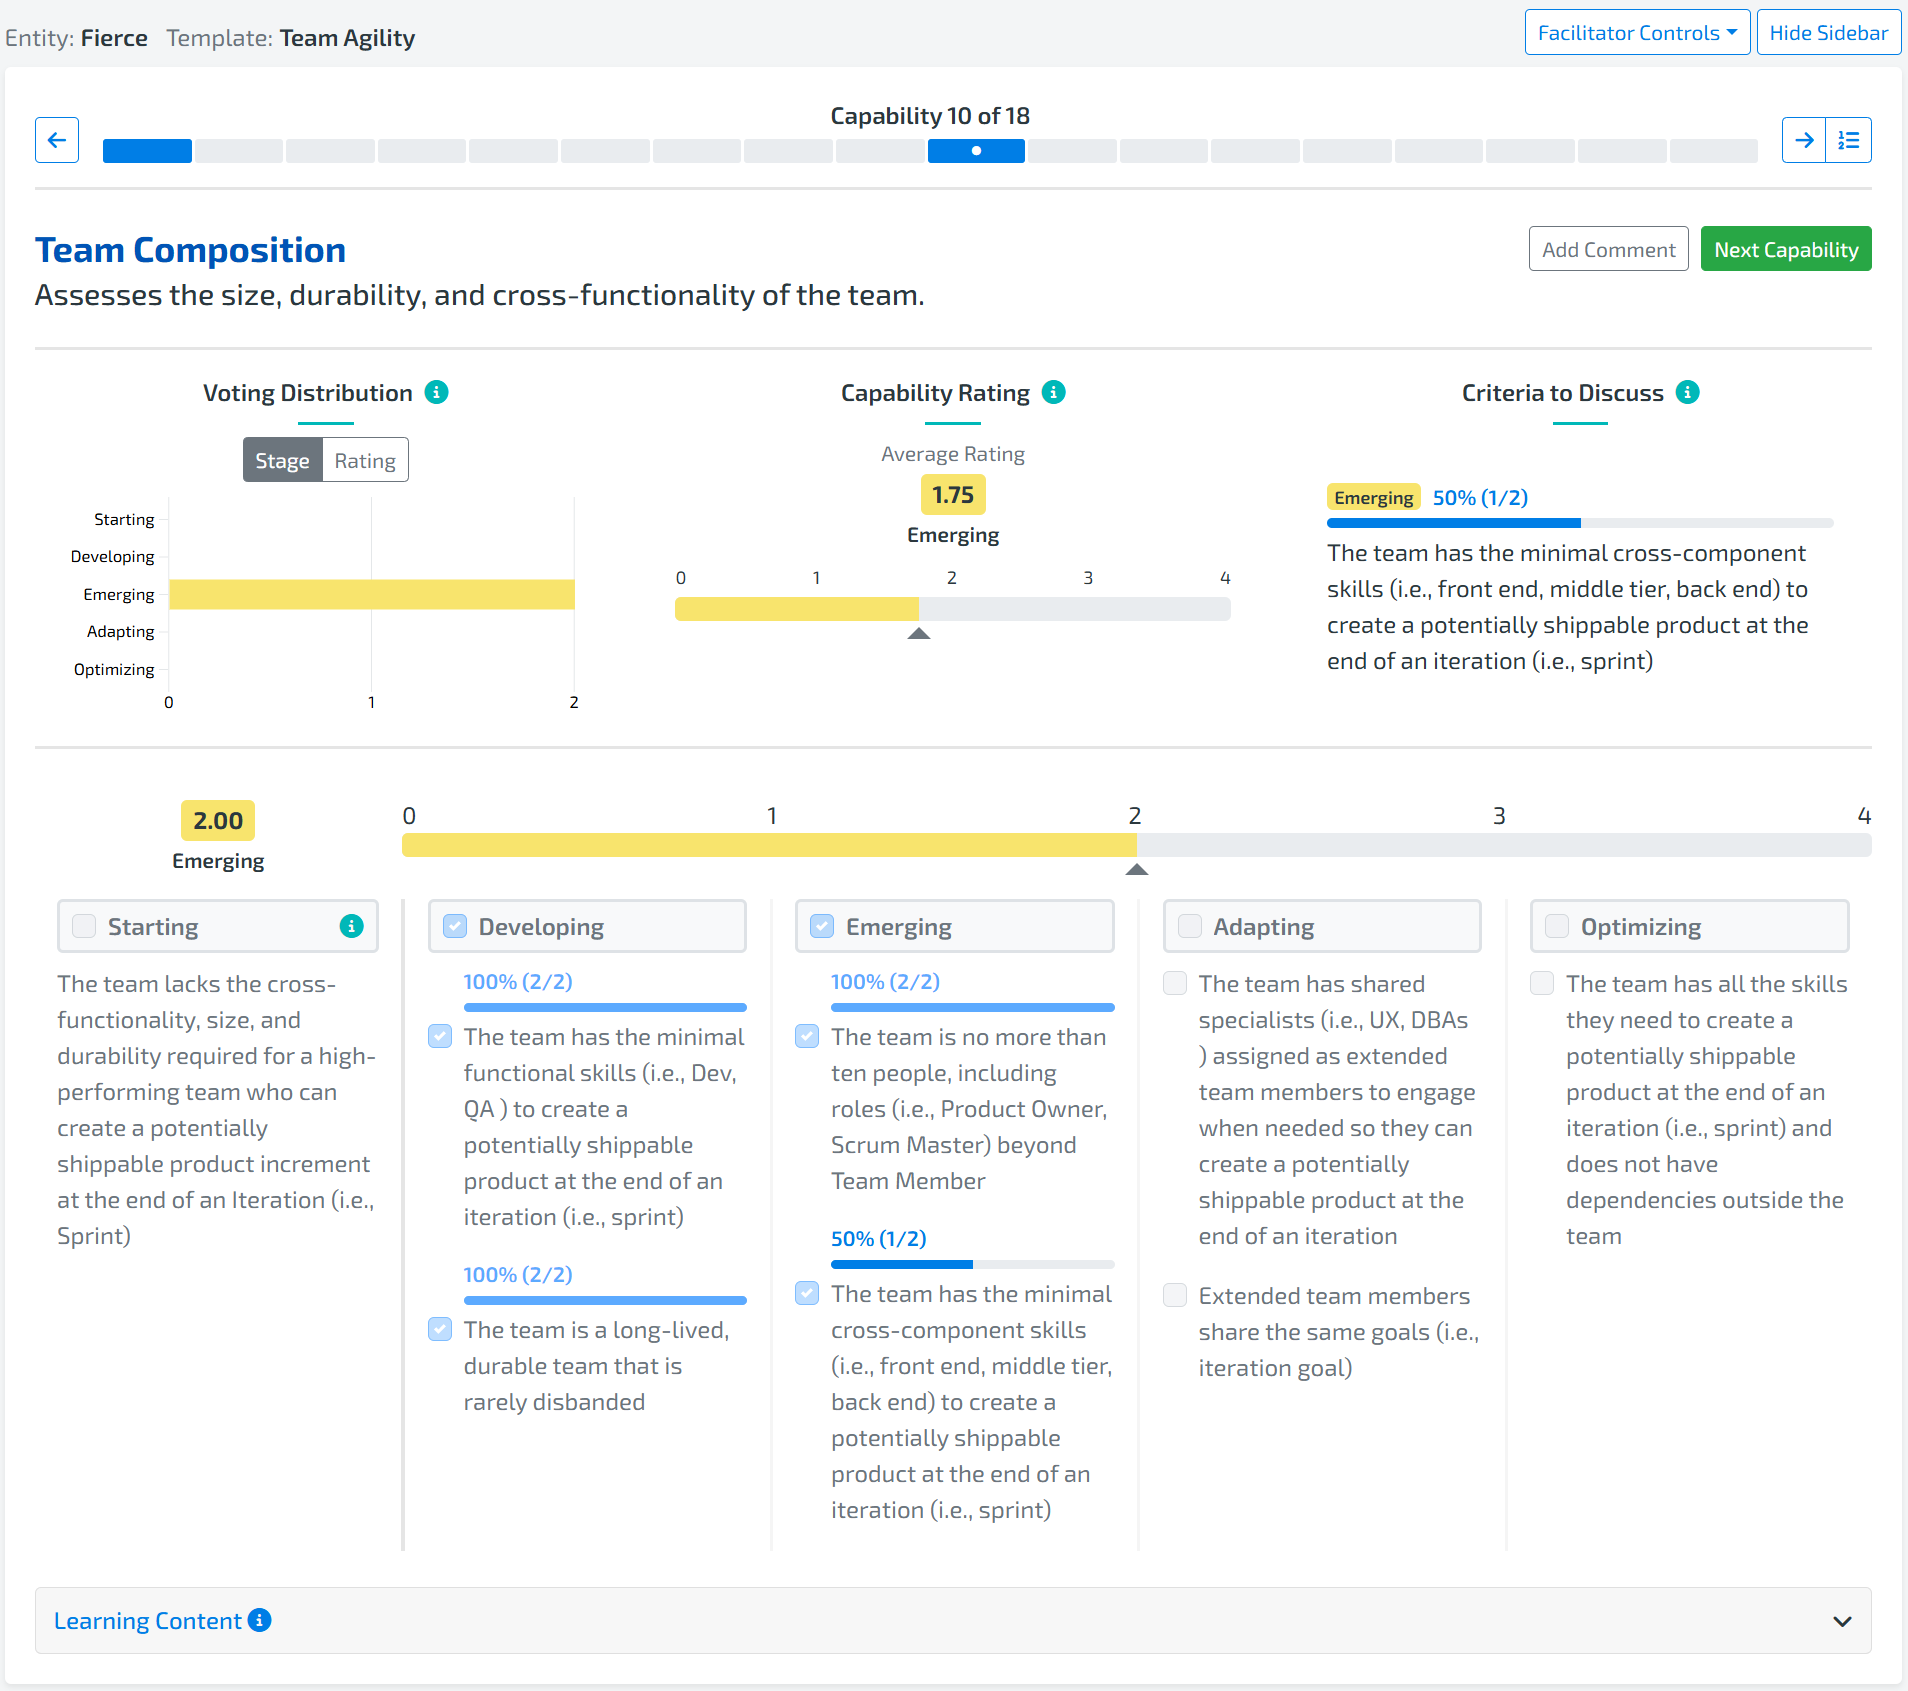
The following Results are displayed in the Voting area
Selected stage and checked criteria: this is your vote (disabled after your vote is submitted)
Criteria level % selected: The percentage of votes that checked the criteria. For example, if 3 out of 5 participant votes check a criteria, it will display “60% (3/5) selected”
Stage level Full/Partial Agreement: Flags where there is agreement or disagreement between team members
Full Agreement is displayed when all criteria in the Stage are 100% selected or 0% selected
Partial Agreement is displayed when at least one criteria in the Stage has between 1%-99% selected