Welcome to the Jira Cloud Integration (Labs) documentation for Lean Agile Intelligence. Our guide aims to simplify the process of integrating Jira with Lean Agile Intelligence, ensuring a seamless workflow for your team.
The “Labs” designation serves as a platform for introducing new functionalities that are still in the iterative build and validation phase. These additions represent untapped potential in our product, and we are committed to ensuring that we proceed in the right direction. When you encounter features, such as our Jira Integration, that are under “Labs” we encourage you to explore them with an open mind and provide us with your valuable feedback. We are keen to understand what aligns with your workflow, what could be improved, and any suggestions you may have to enhance a feature or page in LAI. Currently, only the Jira Cloud Integration is under “Labs”
Disclaimer: Please be advised that while using the Labs version of the Jira Cloud Integration, there's a potential for unexpected behaviors or issues. Lean Agile Intelligence is not responsible for any disruptions or changes that may occur within your Jira account. We recommend taking necessary precautions, and thoroughly test the integration in a controlled environment before full-scale implementation or wait for our generally available designation of the Jira Cloud Integration. We will post an announcement once Jira Cloud Integration is no longer under the Lab’s designation
Article Contents:
Jira Integration | Authentication
Jira Configuration
Creating jira-Mapped Improvement Actions
Managing Jira-Mapped Improvement Actions
Disconnecting jira integration
In addition, feel free to follow along with our video companion Jira Cloud Integration Series.
Jira Integration | Authentication
This feature enables seamless and secure communication between Lean Agile Intelligence and Jira Cloud, providing an easier way to integrate the two platforms. This guide will walk you through all the necessary steps to set up the feature and help you make the most of it.
Preconditions:
Sync Account Creation:
It's recommended to establish a sync account with the required permissions for system authentication.
Ensure you log into Lean Agile Intelligence using the email associated with the Atlassian sync account.
Note: The reporter for any Jira item created will be the sync account or the individual who authenticates the Lean Agile Intelligence-Jira integration.
Admin Permission in Lean Agile Intelligence:
Ensure that the sync Account has Admin permission in Lean Agile Intelligence.
Required Permissions:
Register and manage Jira webhooks.
Read Jira project and issue data, search for issues, and access associated objects like attachments and worklogs.
Create and edit issues in Jira, post comments, create worklogs, and delete issues.
Instructions
1. Login to Lean Agile Intelligence (optional as the Sync Account to ensure reporter is not you for every work item create by LAI) and navigate to the Account Page.
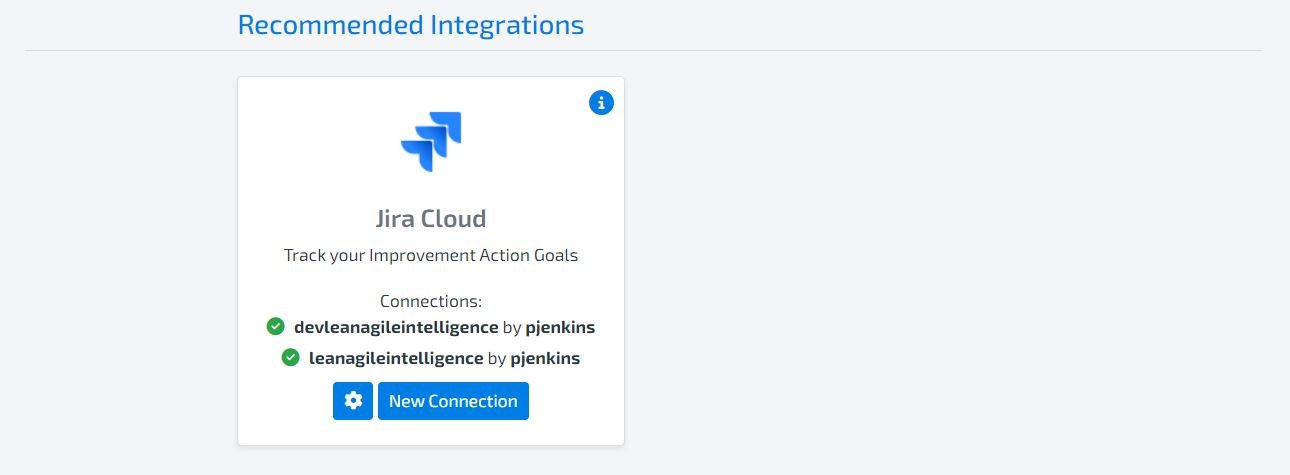
2. Scroll to the Recommended Integrations Section and select Connect on the Jira Cloud Integration Widget.
3. Follow Atlassian's Authorize app wizard (choose a site and accept).
4. You will be directed back to Lean Agile Intelligence to start Jira Configuration.
5. If you wish to connect to another Jira instance, repeat steps #2 and #3. In step #3, under “Authorize for site” select a different Jira instance.
6. Upon being redirected back to the Account page, you will see all the instances to which you are now connected to.
7. If the green icon in front of the instance turns red, this indicates that the instance has been disconnected. To reestablish the connection, click on the “Reconnect/New Connection” button and repeat steps #2 and #3.
Important Note: Please note that if another admin establishes a connection to an instance previously connected by a different admin, LAI will use the newly established connection.
Note: To disconnect the Jira Integration from Lean Agile Intelligence, check out our Disconnecting Jira Documentation.
Jira Configuration
Once authenticated, members with admin permission can set up Jira for their organization, allowing seamless integration of improvement actions directly into the Jira backlog.
Preconditions:
Ensure you have authenticated to Jira.
You must be an admin in Lean Agile Intelligence to configure Jira for your organization.
Instructions
1. Navigate to the Account Page of Lean Agile Intelligence.
2. Scroll to the Recommended Integration Section.
3. Select the Settings button on the Jira Cloud Integration Widget.
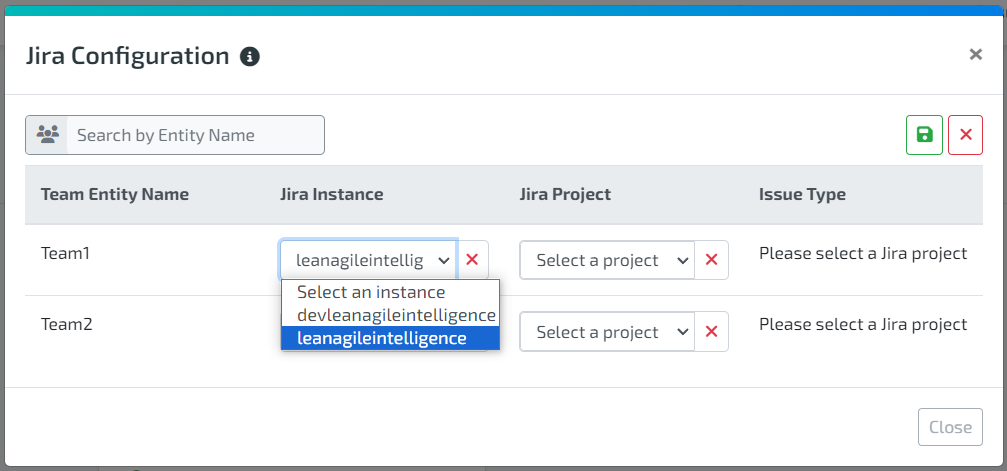
4. The Configuration screen will be shown with a list of Team entities in your organization.
Note: In the current version, configuration is limited to the Team entity.
5. Select the Edit Configuration button.
A list of Team entities will be displayed.
Use the search bar to quickly locate a specific entity by name.
6. Configure Jira Instance, Project, and Issue Type for each Team entity.
For each Team Entity, select the Jira Instance, then select the Jira project where you want the improvement actions to be created.
Choose the desired issue type for the improvement actions.
Note: Only issue types that aren't children of other issue types can be selected.
Use the search bar to quickly locate a specific Team entity by name.
Important Note:
It's not mandatory to configure all Team entities to begin creating Jira-mapped improvement actions. You can start using the Jira integration even if some entities are left unconfigured.
Creating Jira-Mapped Improvement Actions
After setting up the Team entities for your organization, both you and your organization members can begin creating Improvement Actions in Lean Agile Intelligence that are seamlessly mapped to Jira.
Who Can Create Jira-Mapped improvement actions?
Team Access:
Admins, Super Users, and Facilitators with access to a team configured with Jira integration can create an improvement action in Lean Agile Intelligence that will be mapped to a Jira issue.
Admin Privileges:
Only admins have the authority to assign a Jira Project and Issue Type to a Team in Lean Agile Intelligence. Check out Jira Configuration for more information.
Instructions
1. Navigate to the configured Team in the Results dashboard.
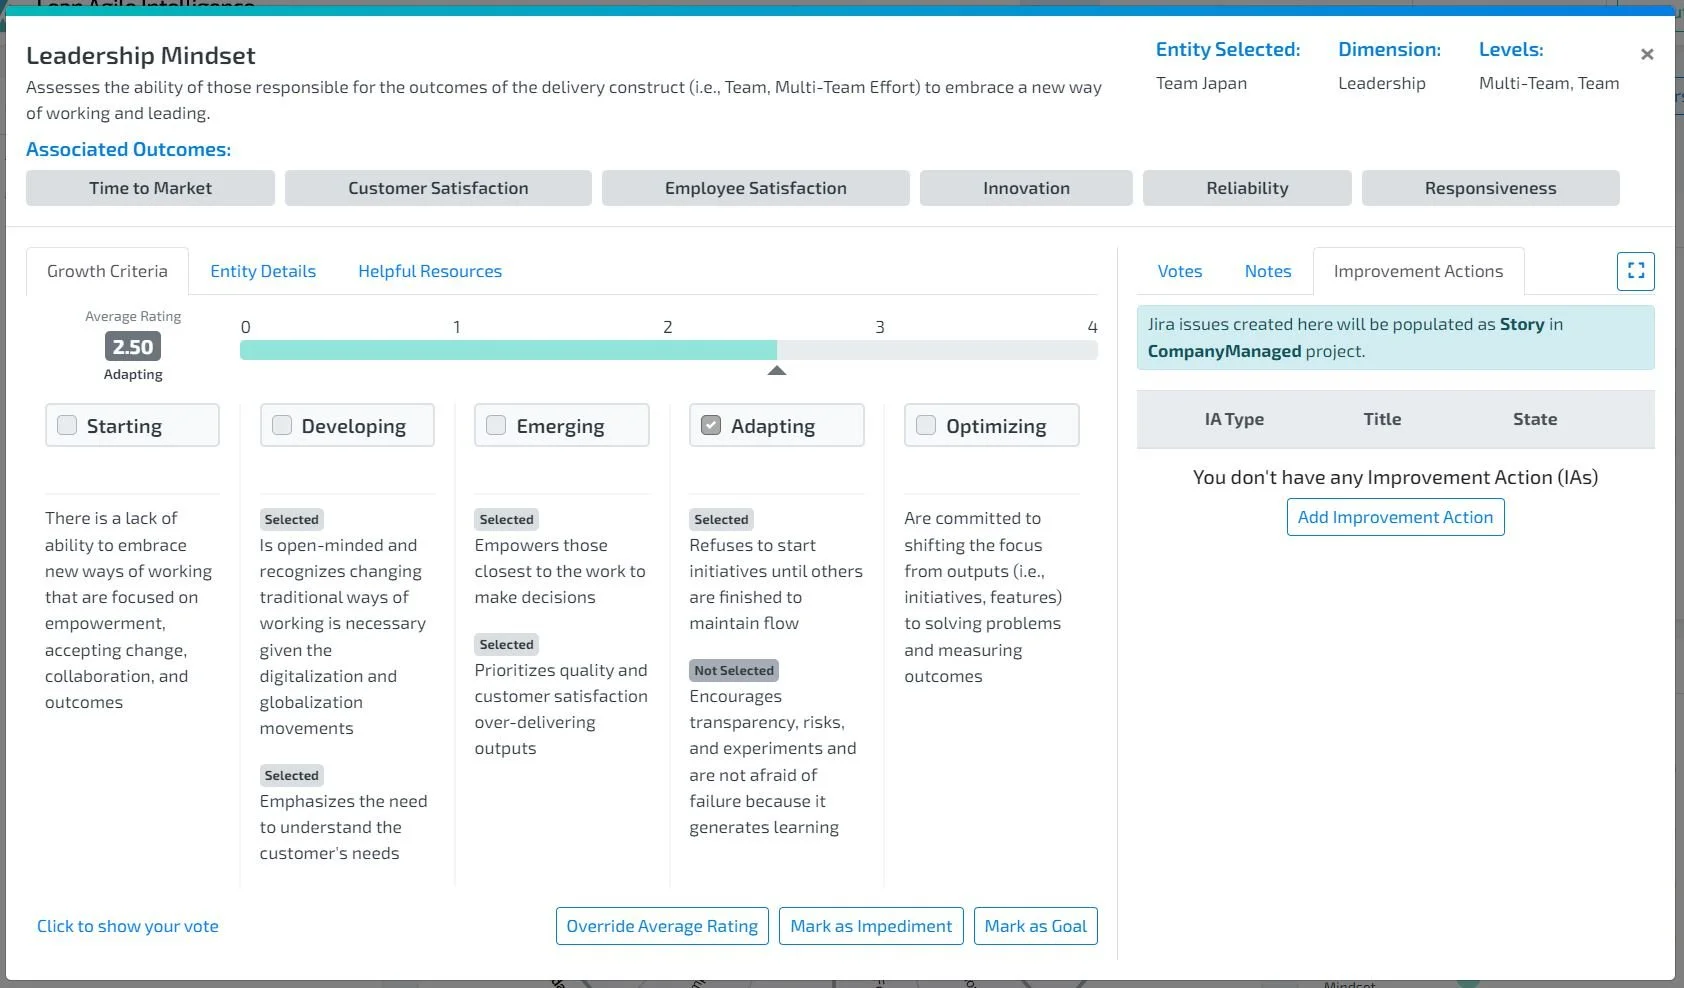
2. Select the Capability for which you wish to create an improvement action.
3. Click and open the Capability Drilldown.
4. Navigate to the Improvement Action Tab.
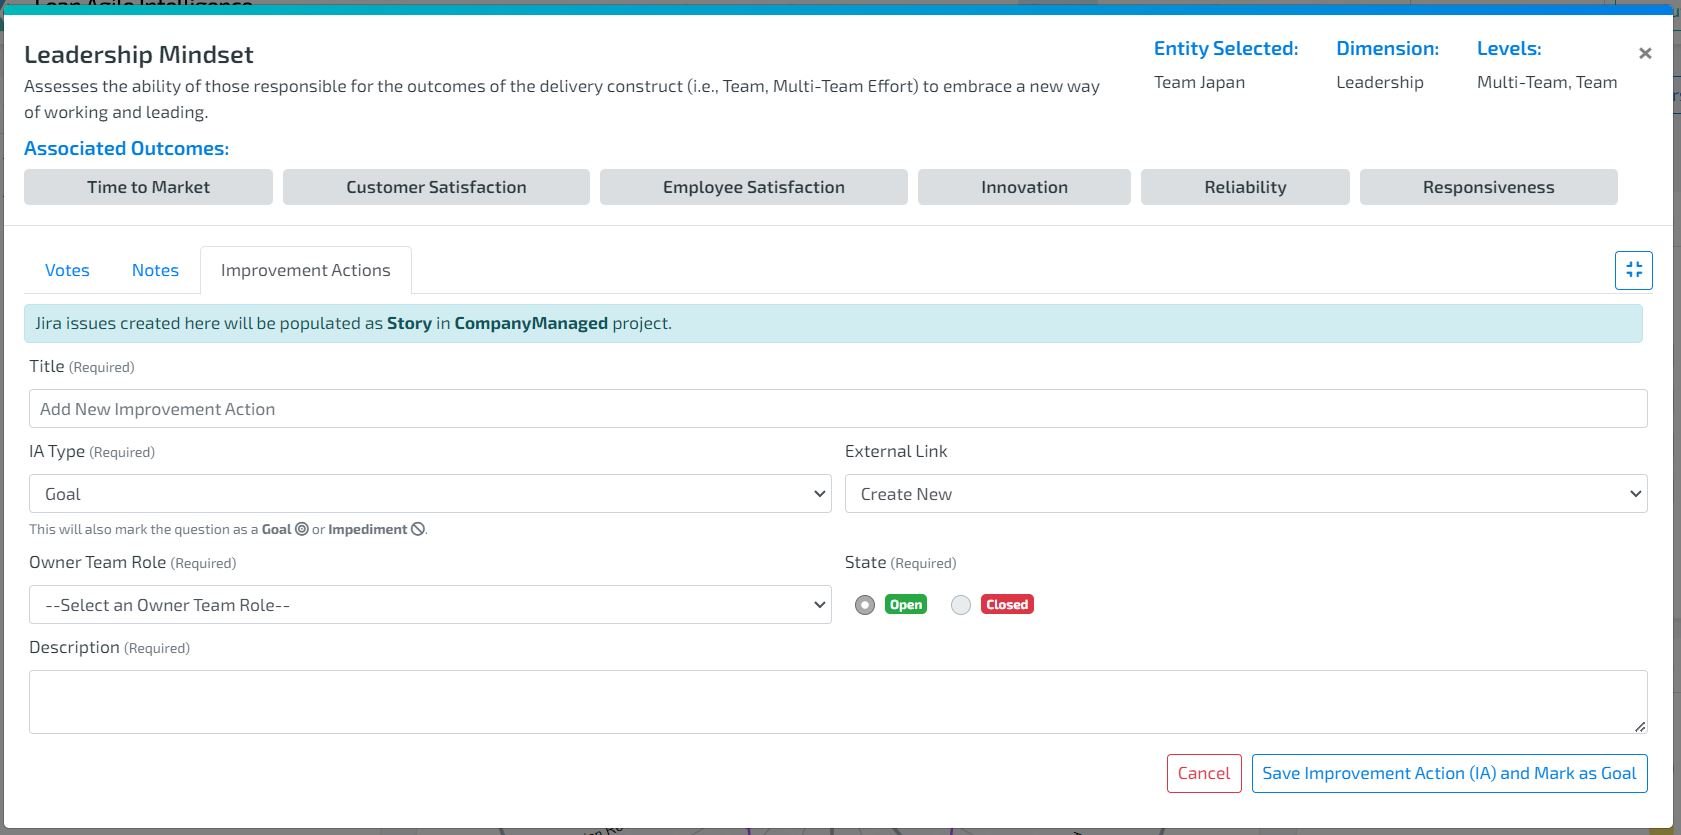
5. Click the Add icon to initiate the creation of a new improvement action.
6. Determine the Improvement Action Type:
If you mark the capability as a goal or an impediment, the action type will be auto-selected for you. However, you retain the flexibility to modify this selection.
Important Note:
Impediment Types:
All impediment improvement actions are exclusive to LAI and currently are not part of our Jira Integration.
Here’s why: While goal improvement actions are straightforward tasks that teams can own and integrate seamlessly into Jira Cloud, impediments are a bit more nuanced. Impediment improvement actions serve as signals, highlighting areas where an individual or team needs assistance. The challenge arises in pinpointing who can address these impediments and determining their exact place within Jira. We believe in providing clear, user-friendly experiences, and we felt that integrating impediments might introduce unnecessary complexity. However, we're eager to refine our approach based on real-world insights. So, we're turning to you, our valued community. How do you handle impediments in your workflow? Your feedback is invaluable to us. And while we gather insights, we're also hard at work crafting a more intuitive way to manage impediments within LAI. Stay tuned for exciting updates, and as always, thank you for being an integral part of our journey!
Goal Types:
If you choose a goal improvement action type and your team is integrated with Jira, the improvement actions you create will be linked to Jira.
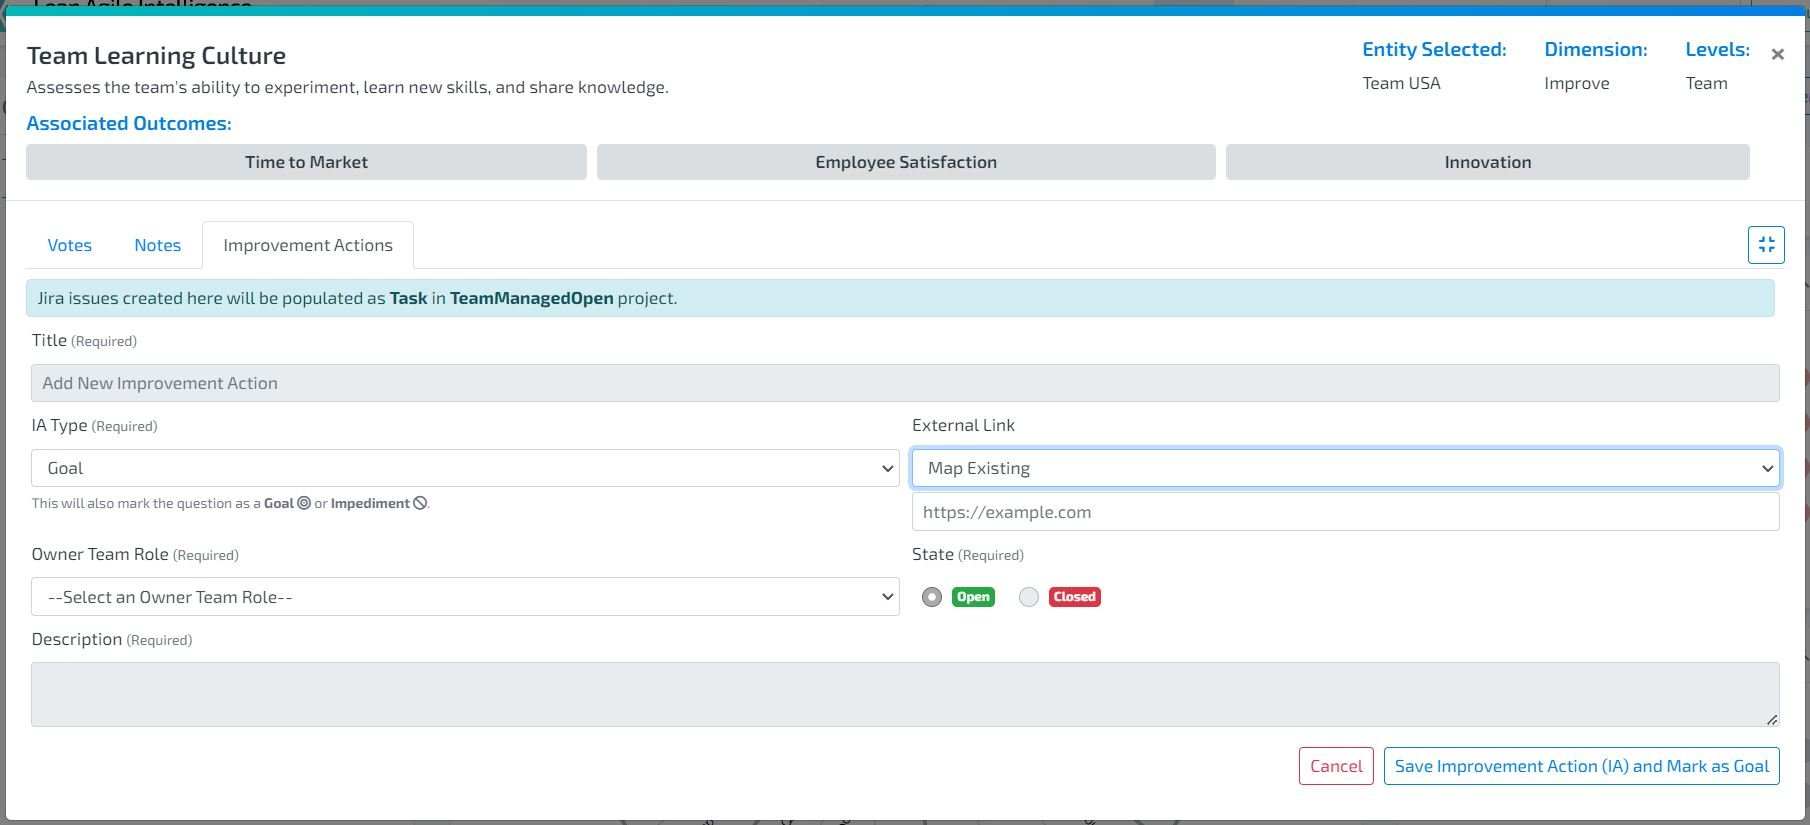
7. Options for Jira-Mapped Improvement Actions:
Create New Option
Create New: This will generate a new Jira issue under the project and issue type configured for your Team entity in Jira.
Map Existing: If there's an existing Jira issue, you can:
Copy its link.
Paste it into the link field in Lean Agile Intelligence.
Select the relevant Owner Team Role.
Note: Owner Team Role is specific to Lean Agile Intelligence and won't affect any Jira fields.
Click save.
The title (Jira summary), description, and status will be generated based on the existing Jira issue that the Improvement Action is mapping to.
Link Retrieval Recommendations:
You can copy the link as Jira creates it.
Alternatively, you can copy it directly from the URL bar.
Ensure the Jira issue exists in the connected Jira instance and follows this format:
https://<domain>/browse/<JIRA_KEY
Map Existing Option
How to grab link from Jira
Post-Creation Options:
After saving, Jira will be the source of truth for the title (Jira summary), description, status, and other fields associated with the Jira issue created or mapped. Please manage the Jira Issues in your Jira dashboard.
Check out this documentation on how you edit, refresh, or delete the improvement action linked to a Jira issue.
Tips:
Regularly verify that the Jira issues and LAI improvement actions are synchronized to avoid discrepancies.
Ensure that the Owner Team Role selected in LAI aligns with the nature of the improvement action for clarity and consistency.
Managing Jira-Mapped Improvement Actions
This section delves into the management of Jira issues when integrated with Lean Agile Intelligence. It covers editing, deleting, and refreshing actions to ensure data consistency and integrity across both platforms.
Instructions
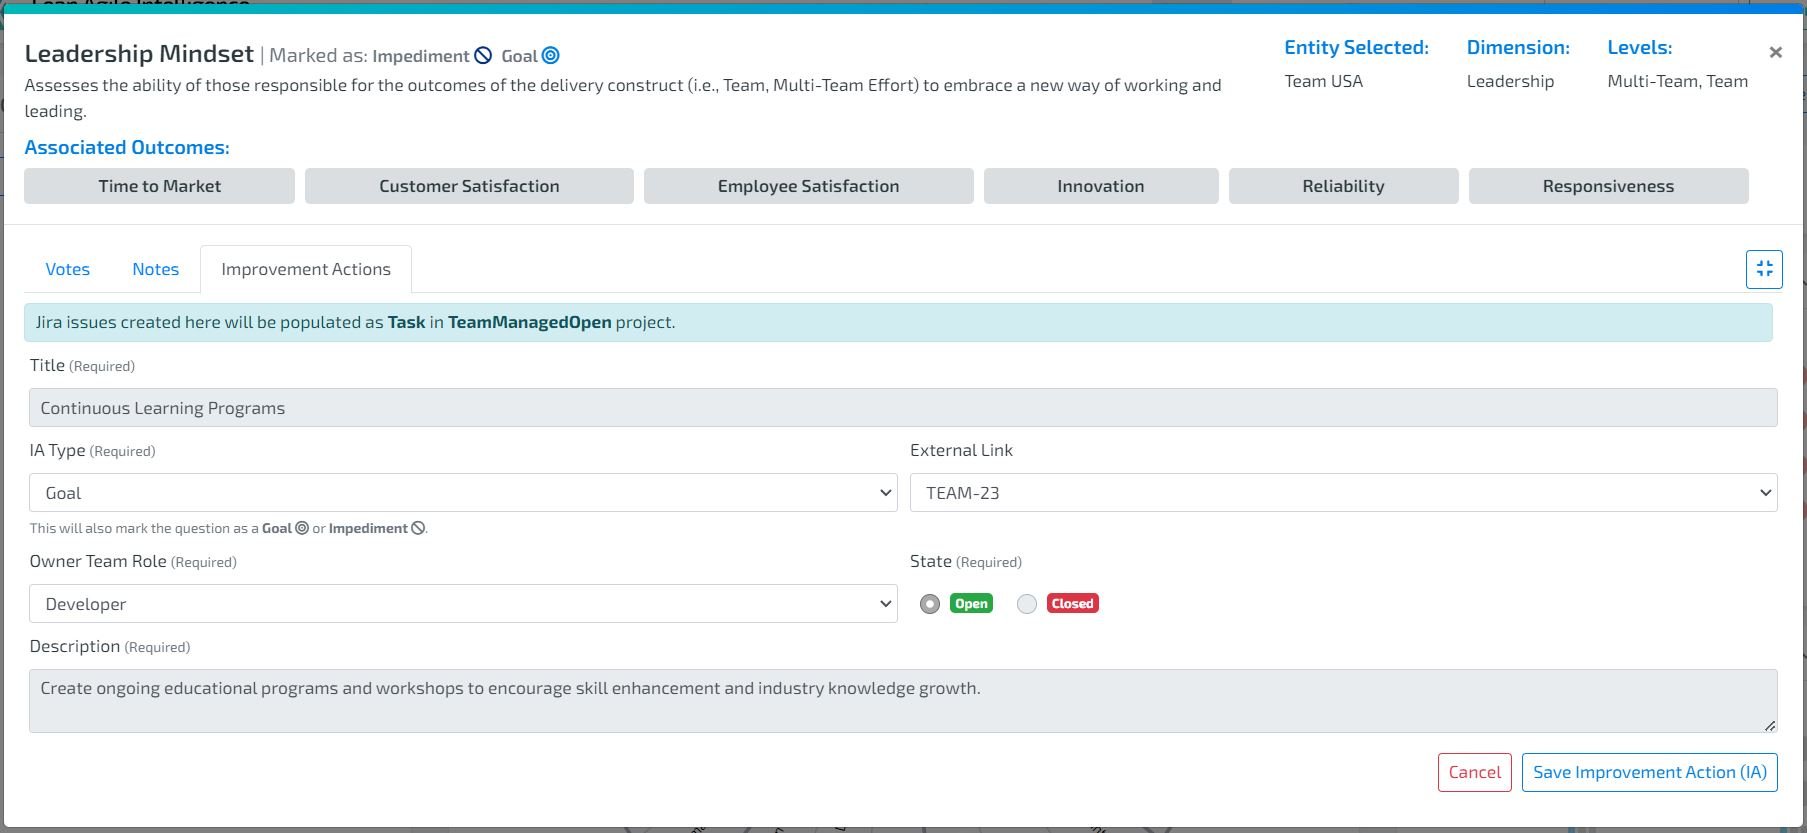
To view the Jira-mapped improvement actions created, navigate to the Team entity, select the capability, select the improvement action tab, and click the expand icon.
Editing Jira-Mapped Improvement Actions:
1. Click the Edit icon next to the Jira-mapped improvement action you wish to modify.
2. There are 3 options in the edit function for Jira-mapped improvement action: Stay Mapped (Jira Key), Create New, and Map Existing.
Stay Mapped (shown as Jira Key):
1. You can modify the Owner Team Role in Lean Agile Intelligence.
2. Changes to title (Jira summary), description, and status must be made in Jira.
Create New:
1. The current mapping to the Jira issue will be removed.
2. You can edit the title, description, and Owner Team Role in Lean Agile Intelligence.
3. Upon saving, a new Jira issue is created under the configured project and issue type for the team. This new Jira issue will then be mapped to the improvement action that is being edited.
Map Existing:
1. Input the external link of the Jira issue you wish to map to the improvement action in the link field.
You can copy the link as Jira creates it.
Alternatively, you can copy it directly from the URL bar.
Ensure the Jira issue exists in the connected Jira instance and follows this format:
https://<domain>/browse/<JIRA_KEY
2. Saving will remove the mapping of the previously linked Jira issue and establish a new mapping to the provided Jira issue.
Deleting Jira-Mapped Improvement Actions:
1. Click the Delete icon next to the Jira-mapped improvement action you wish to delete.
2. Deleting a Jira-mapped improvement action will only remove the action within Lean Agile Intelligence. The corresponding Jira issue remains unaffected and will not be deleted.
Refreshing Jira-Mapped Improvement Actions:
1. Click the Refresh button on the Jira-mapped improvement action you wish to view the updates to.
2. In Lean Agile Intelligence, this will update the status of the mapped Jira issue, indicating whether it's open or closed.
3. A closed status implies the issue is marked as done or has a resolution date. This will also update the title (Jira summary) and description of the Jira issue if changes were made in Jira.
Note: We do not accept rich text at this time. This means that you might not see everything in the description input from the Jira side.
Jira serves as the source of truth for every Jira-mapped improvement action. Check the Jira Issue in Jira to view the correct title (Jira summary) and description.
Tips:
Regularly synchronize Lean Agile Intelligence and Jira to ensure that the statuses and details of Jira-mapped improvement actions are up-to-date.
Always verify the Jira issue's link in the External Link field in Lean Agile Intelligence before making changes to ensure you're editing the correct action.
Only simple text will show in Lean Agile Intelligence description. Bullets, numbers, and other special characters such as emojis will not show. You will need to review the Jira issue in Jira to see the full description.
Disconnecting Jira Integration
It's essential to follow the procedure below to ensure a complete disconnection.
Who Can Disconnect?
The member with access to the sync account used to establish the Jira Integration.
What Does It Mean To Disconnect?
Once disconnected from Jira, members will not be able to create an improvement action that is linked to a Jira issue. This includes: Create New and Map Existing.
Existing Jira-mapped improvement actions would still contain that external link mapping to the Jira Issue. However, members will not be able to refresh and receive updates about the mapped Jira Issue.
Instructions
1. Log into your Atlassian account.
2. Navigate to Account Settings in the top right corner or within the member profile dropdown.
3. Within the Account Settings, locate and click on the Connected Apps section, typically found at the top center of the page.
4. Remove Lean Agile Intelligence access:
Find the Lean Agile Intelligence Integration app in the listing.
Select the Remove Access option to disconnect Lean Agile Intelligence from Jira.
Important Note: Please note that this will disconnect all Jira instances to LAI that you have admin access to.
Tips:
Ensure you have the necessary admin privileges before attempting to disconnect.
After disconnecting, verify in both Lean Agile Intelligence and Jira to ensure the integration has been completely severed.

