
Article Contents:
What IS A CUSTOM TIME PERIOD?
HOW TO SETUP A CUSTOM TIME PERIOD
HOW TO VIEW CUSTOM TIME PERIODS
HOW TO EDIT CUSTOM TIME PERIODS
HOW TO DELETE CUSTOM TIME PERIODS
HOW CUSTOM TIME PERIODS APPLY TO RESULTS SCREEN
HANDLING EXPIRED SEQUENCES
This guide helps you understand and use Custom Time Periods to customize how you want your insights being displayed in the Results Screen.
1. WHAT IS A CUSTOM TIME PERIOD?
In Lean Agile Intelligence (LAI), the default time periods used on the Results page are quarterly for Qualitative assessments and monthly for Quantitative assessments. However, recognizing that organizations and teams have unique needs, LAI offers the ability to create custom time periods. Custom time periods allow you to create sequences that align with your team's or organization's specific schedules, such as Sprints, Pulse Checks, etc., providing more relevant and meaningful insights.
2. HOW TO SETUP A CUSTOM TIME PERIOD
Pre-Requisites
Ensure you have Admin or Super User permission level.
Note: Super Users can create, edit, and delete custom time periods and assign them to entities and groups they have access to.
Steps to Create a Custom Time Period
1.) Navigate to the Custom Time Periods Screen:
Under the Organization Setup menu in the navigation bar.
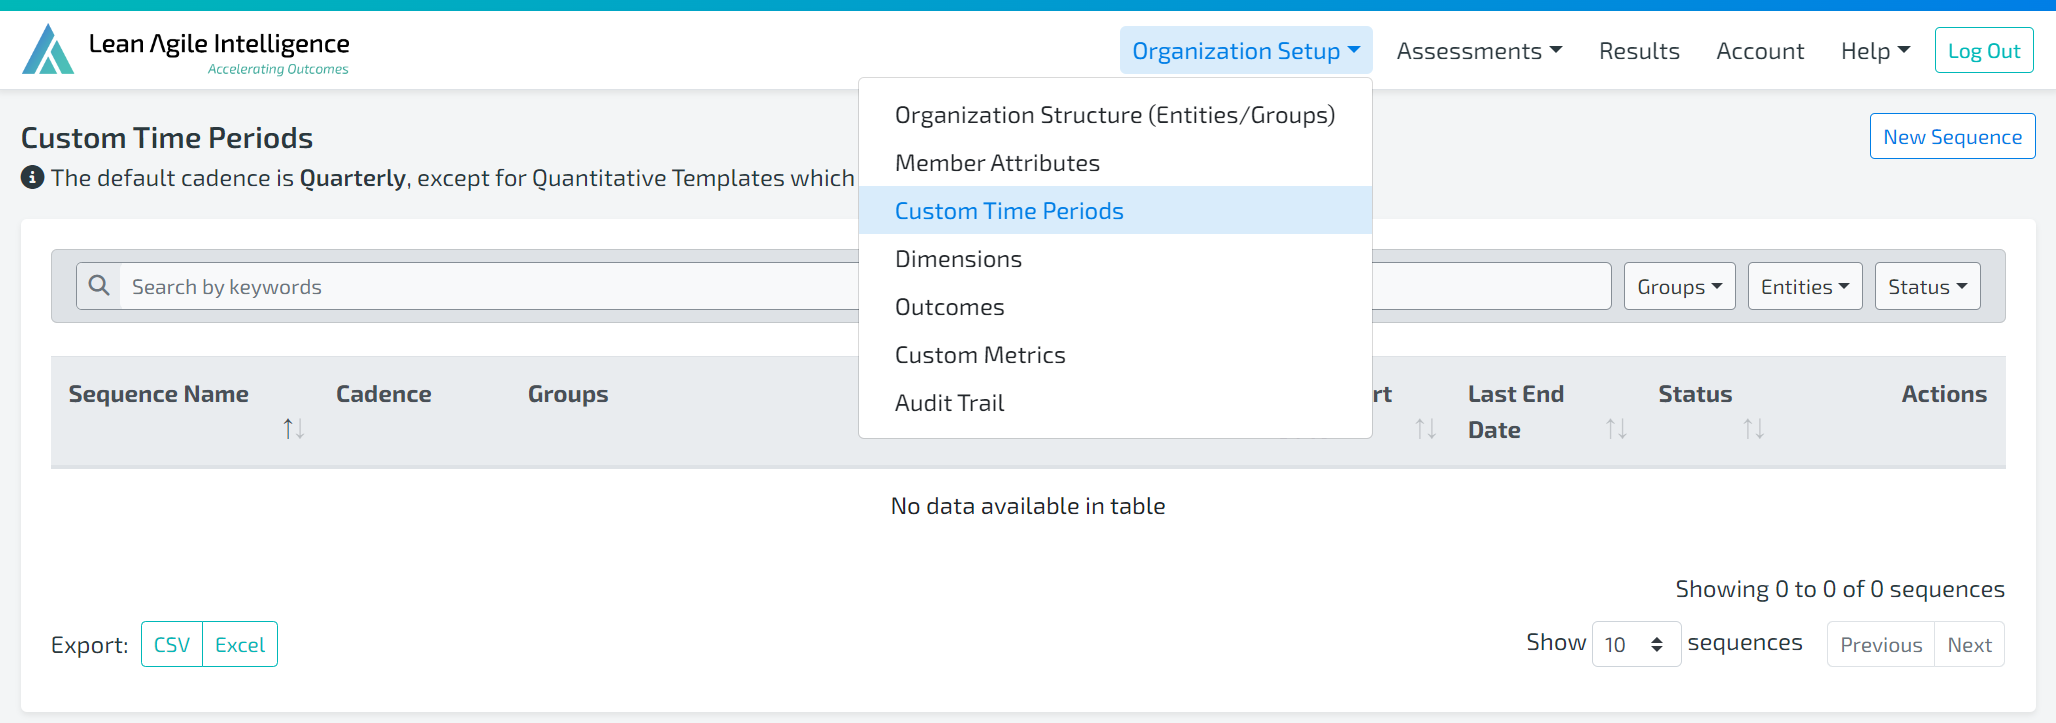
2.) Creating a New Custom Time Period Sequence:
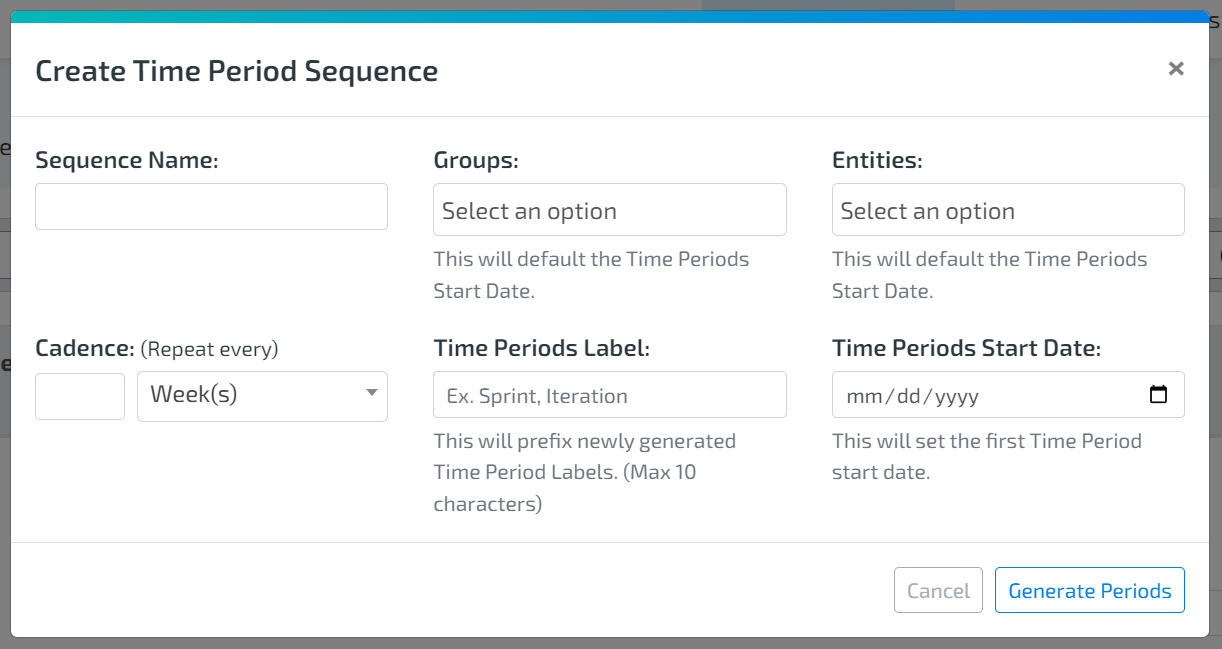
Click on the New Sequence button at the top right to open the Create Time Period Sequence modal.
Enter the following details:
Sequence Name: Set the name of the custom time period
Groups: Assign the groups you want to include in the time period sequence. All entities of this group and child groups will also have this custom time period unless they have their own custom time period assigned.
Entities: Assign the specific entities to the custom time period sequence.
Cadence: Set the interval for generating time periods (this can be edited later).
Time Periods Label: Prefix for newly generated time periods.
Time Periods Start Date: Set the first time period's start date. Ideally, this should be the first assessment date of the group or entities assigned. If unsure, select the groups or entities, and the system will auto-populate the earliest first assessment date.
Click Generate Periods to create the time periods for the sequence.

3.) Adjusting Time Periods:
After generating, you can see all created time periods from the start date to the current date.
Adjust the start and end dates of each period as needed, especially for irregular periods such as holidays.
Time periods are arranged from most current to oldest.
Restrictions:
Time periods cannot overlap
There cannot be open days between time periods
Note: If your first time period does not start before or on the oldest first assessment among the groups and entities selected, you will receive a warning like what is shown in the picture. You can still create the time period sequence. However, the data of your first assessment will be grouped into the calculations of the first time period of the time period sequence.
Modify the Time Period Labels (max 15 characters).
To create future time periods, verify the cadence, enter the desired number of new periods, and click Add New Periods.
4.) Finalizing:
If you need to adjust the cadence, labels, or start date, click Go Back to make changes.
Once satisfied, click Save.
3. HOW TO VIEW CUSTOM TIME PERIODS

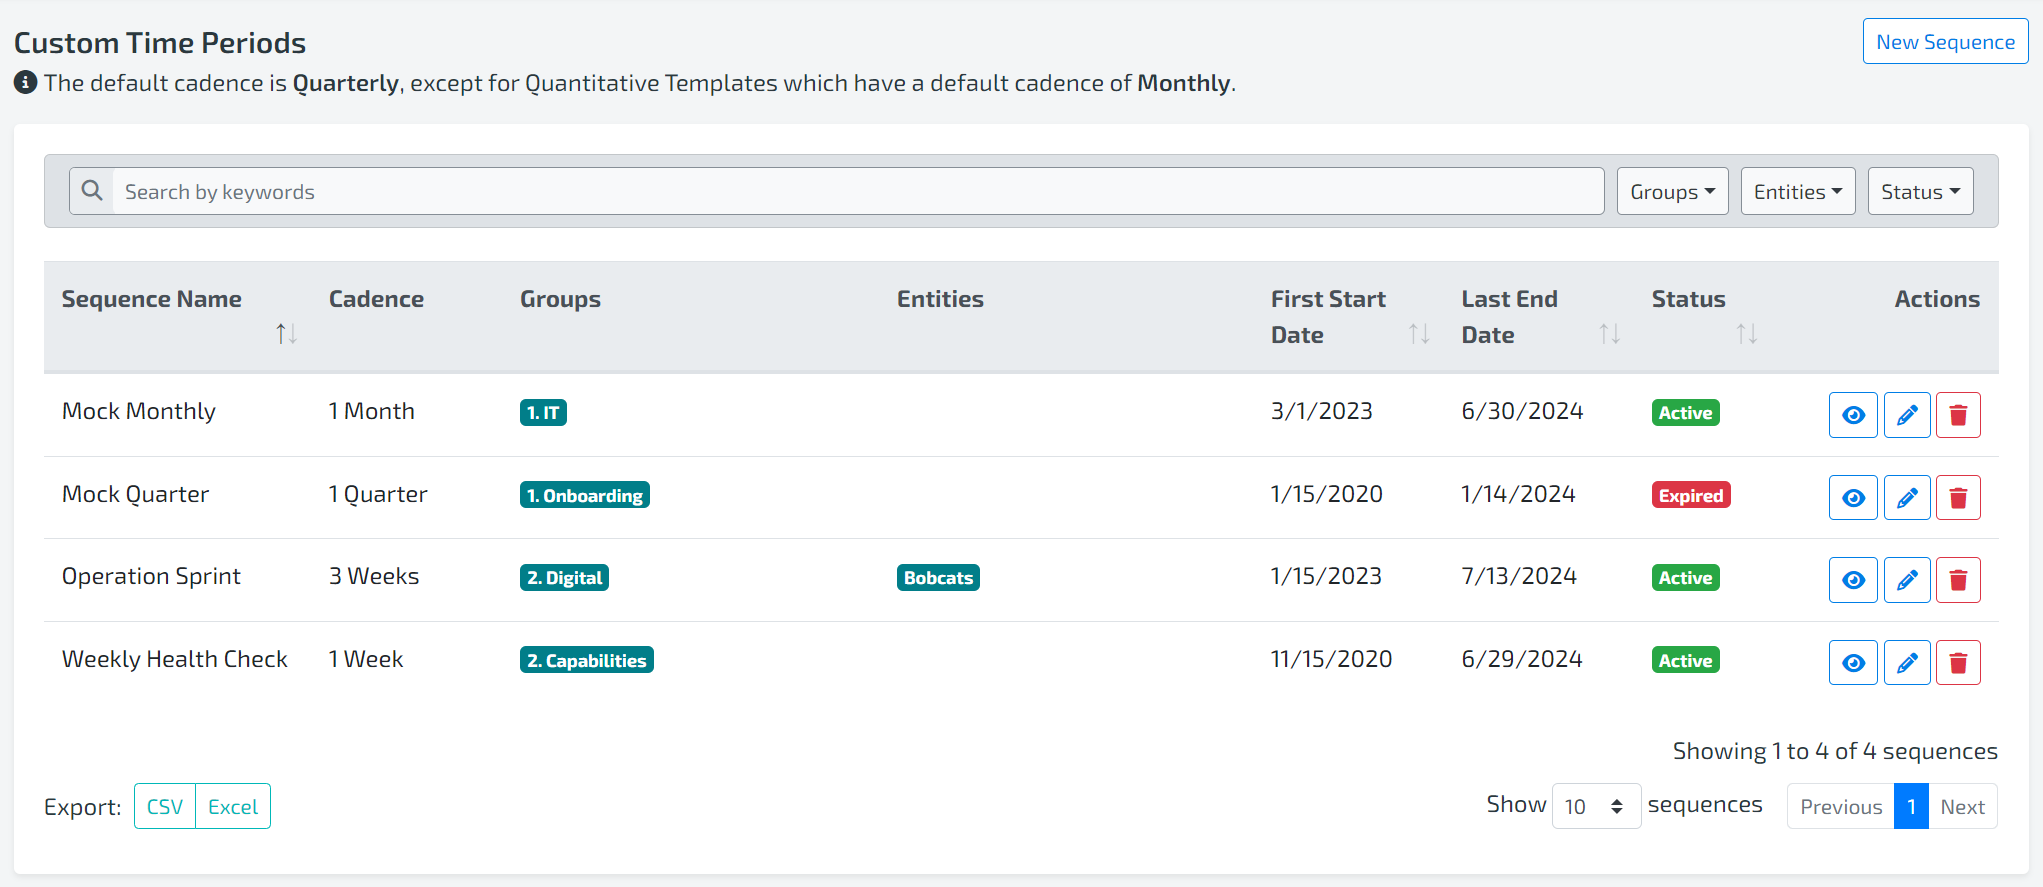
In the Custom Time Periods table, you can view:
Sequence Name
Cadence
Groups/Entities assigned to the time period sequence
First Start Date: Start date of the first time period in the sequence
Last End Date: End date of the last time period in the sequence
Status:
Active: End date of the last time period is on or after today’s date.
Expired: End date of the last time period is not up to date.
Note: The statuses inform you if the last time period is current. However, they do not determine if the custom time period will be applied in the Results page.
Example 1: If an entity has all its data outside of the active time periods in a sequence, the time period sequence will not be applied in the Results page.
Example 2: If an entity has a time period sequence with an expired status assigned, but the entity's last assessment period falls within the last time period of that sequence, the time period sequence will be applied in the Results page.
Warning Messages: There will always be a warning message on the Results page informing you if a group/entity has a time period sequence assigned but not applied due to having data outside the available time periods.

Viewing Details
Click the Eye icon in the action column to view details of a custom time period sequence.
The modal will display:
Sequence Name
Groups/Entities assigned
Cadence
Time Periods Label
All Time Periods with their labels, start dates, and end dates
4. HOW TO EDIT CUSTOM TIME PERIODS
1.) Editing a Sequence:
Click the Pen icon in the table or the Edit button in the view modal.

In the Edit modal, you can:
Modify the Sequence Name
Add or remove Groups and Entities (Super Users can only modify those they have access to)
Add new time periods
Generating New Time Periods:
Change the cadence and time period label for new periods.
Enter the number of new periods to generate and click Add New Periods.
The new time periods will be generated according to the new cadence and time period label if they were modified.
Adjusting Time Periods:
Edit the labels, start dates, and end dates of each period.
Delete specific time periods if necessary.
Click Update once all changes are made.
5. HOW TO DELETE CUSTOM TIME PERIODS
To delete a time period sequence, click the Trash Can icon in the Custom Time Periods table.
Confirm your decision in the delete confirmation popup.
6. HOW CUSTOM TIME PERIODS APPLY TO RESULTS SCREEN
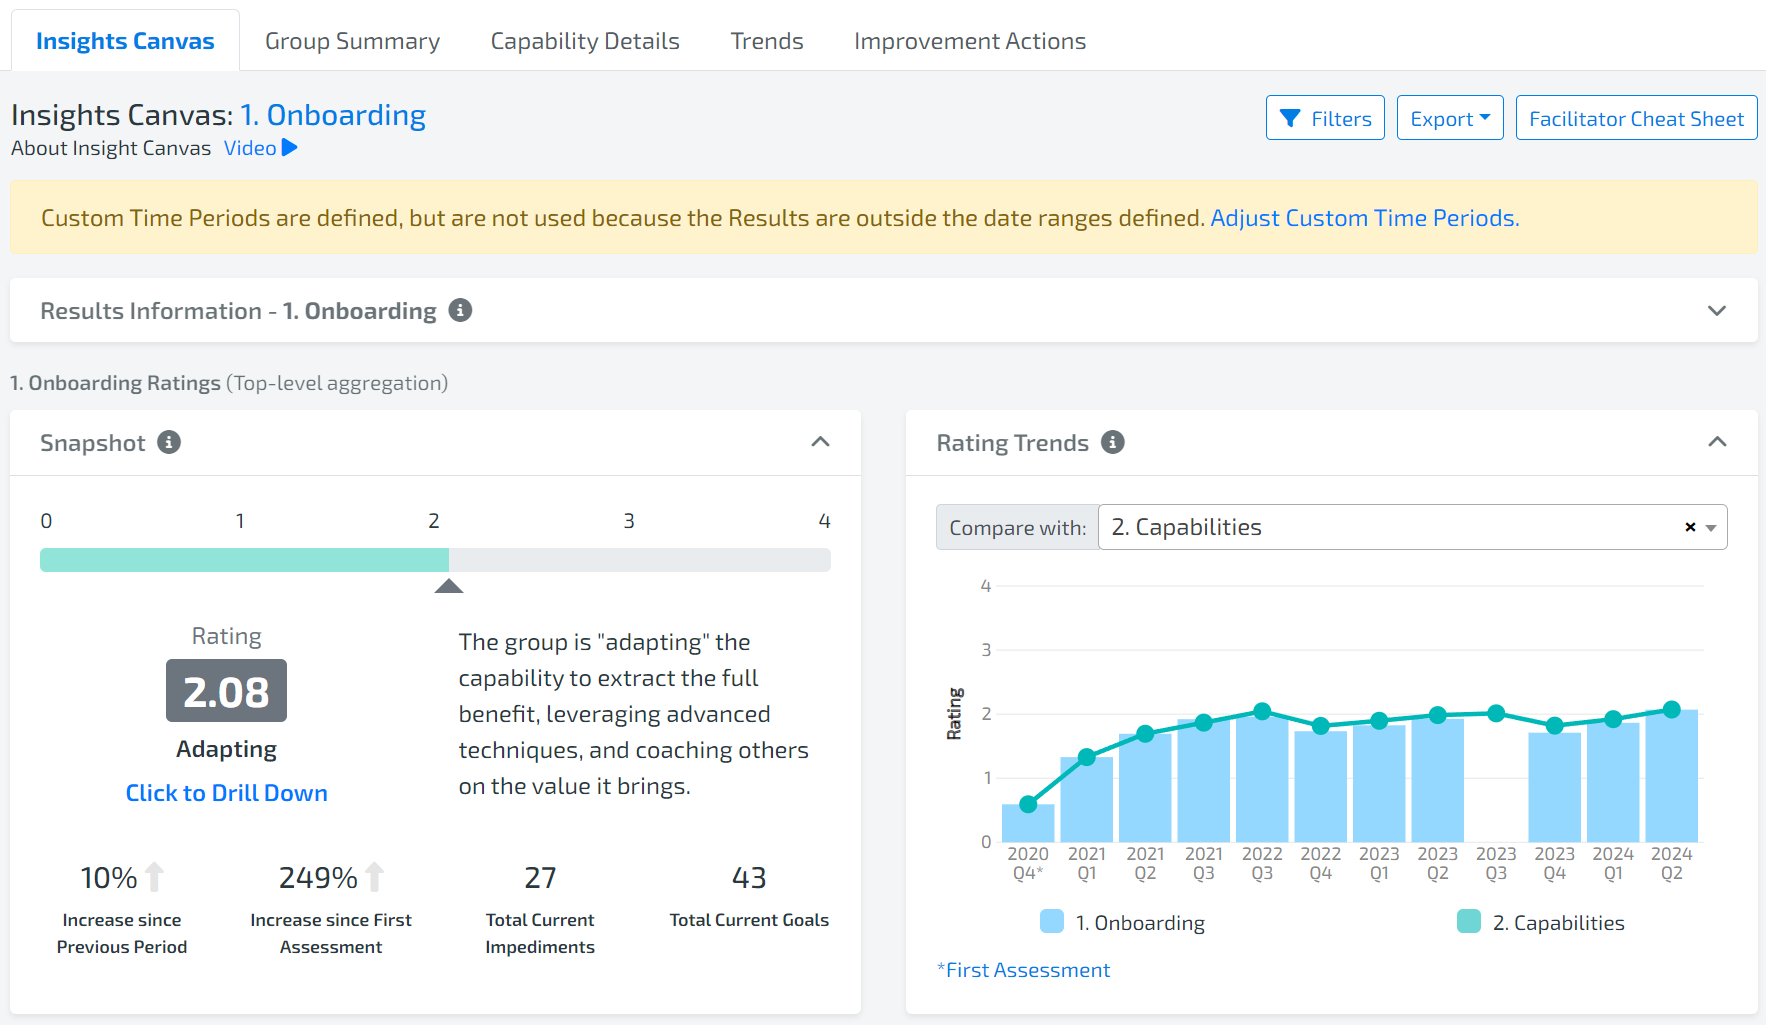
Custom time periods are a Results-wide enhancement. It influences the Insights Canvas dashboard, Trends dashboard, and all drilldowns by tailoring data views to your specific needs. All drilldowns will display the periods in the time period labels as will all dashboards where periods are displayed. On the Insights Canvas, these custom periods are reflected in the Rating Trends, Capability Trends, and Custom Metrics. Similarly, on the Trends dashboard, custom time periods are applied to the Outcome Trends and Dimension Trends, ensuring all trend data is relevant to your defined assessment intervals.
Insights Canvas Dashboard
Rating Trends and Capability Trends

Custom time periods replace the default quarterly or monthly time periods, making your trends more relevant to your specific workflow. The trends in the Rating Trends and Capability Trends sections are calculated and displayed based on the custom time periods assigned to the entity or group.
Custom Metrics

Custom metrics trends will display labels based on your custom time periods rather than the standard date format. The Custom Metric History table will also include a Label column to indicate the custom time period each metric falls into.
TRENDS DASHBOARD
Outcome Trends and Dimension Trends

Similar to the Rating Trends and Capability Trends, the Outcome Trends and Dimension Trends are calculated and displayed according to the custom time periods applied to the entity or group. This ensures that the data reflects your unique assessment schedule.
VIEW AT DIFFERENT LEVELS
At Organization Level
Custom Time Periods are not applicable to this level. The Results page will use the default quarterly view and monthly view for quantitative assessments only.
At Group & Entity Level

Application: When a custom time period is assigned to a Group, it is applied to all child groups and entities unless they have a custom time period assigned.
Data Handling:
Data from assessments taken before the first time period will not be plotted but could still be included in future time periods if a template has not been reassessed.
Data from assessments taken after the last period will cause the Results page to revert back to using the default quarterly or monthly view. This means that the custom time period assigned will not be used.
7. Handling Expired Sequences
Custom Time Period Status:
In the Custom Time Period screen, the status of the time period sequence will show as "Expired" if the end date of the last time period in the sequence is before the current date.
This expiration status does not necessarily mean that the custom time period will not apply to the Results for the entities or groups it is assigned to.
If the entities/groups' last assessment date is still within the last time period in the sequence, then the custom time period will still apply.
If the entities/groups have an assessment taken after the end date of the last time period in the sequence, then the custom time period will not be applied.
Launching Assessments with Expired Custom Time Periods:

When launching an assessment, if you have an expired custom time period, you will receive a warning message in the Launch Assessment Wizard.
Facilitators: The message will ask you to inform your administrator.
Admin or Super User: You will see a link that allows you to go to the time period sequence and add more time periods.
Viewing Results with Expired Time Periods:
When viewing the results of an entity or group with expired time periods, you will see a message at the top of the page.
The message will inform you that the results are being displayed in Lai's default time period view because the entity or group has data outside of the assigned time period sequence.
You will also see a link that allows you to add more time periods.
Clicking on this link will take you to the edit modal for the specific time periods that need to be adjusted.